Overview
In this tutorial you will learn how to create and install your own module for AtroCore software development platform. Example module we refer to in this guide can be found here: https://github.com/atrocore/example-module
Module structure
Module consist of backend and frontend parts.
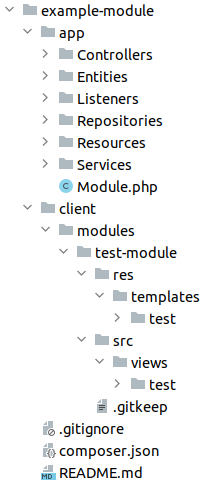
As you can see module consist of two main folders - app, where the backend part is stored, and client - where the frontend part is stored. The root module folder should contain composer file with all information about the module as well as all its dependencies and may contain any other files such as markdown files, git files, etc.
The PhpStorm plugin AtroCore Toolkit can help you generate a new module automatically.
Backend folder
app folder has the following structure:
Module.php- main module class where module configuration (module load order, path to files, loading metadata and layouts, etc.) is describedControllers- contains the controllers of the moduleEntities- folder with ORM entity classesListeners- event listener classesRepositories- stores entities repositories where are contain queries logic.Resources- has several subfolders such as:i18n- contain modules translationslayouts- contain module layoutsmetadata- contain module metadata, which are available in the backend as instance ofEspo\Core\Utils\Metadataclass from containerTo get data from metadata use such way
$metadata->get(['entityDefs', 'Test', 'fields', 'name', 'type'], 'varchar'). Second argument means default value. In frontend metadata object is accessible from all views object by methodgetMatedata. For examplethis.getMetadata().get(['entityDefs', 'Test', 'fields', 'name', 'type']).- Metadata has next sections:
app- application definitionsclientDefs- frontend parameters for entity typesentitiyDefs- entity definitions such as fields, links, indexesscopes- general parameters for entity typesfields- field type definitions
Services- main business logic to work with dataA record service handles CRUD operations over entities. They extend base class
Espo\Services\Record.- Main methods of the Record service are:
readEntity- get an entity recordcreateEntity- create new entity recordupdateEntity- update entity recorddeleteEntity- delete entity recordfindEntities- get list of entities by search parameters, used in list viewfindLinkedEntities- get list of related entities, used in relationship panels.
Module.php
Here is a simple code example for module class.
    class Module extends AbstractModule
    {
        public static function getLoadOrder(): int
        {
            return 9999;
        }

        // optional
        public function onLoad()
        {
        }
    }
It has only one required method that must be realized - getLoadOrder. It must return an integer value that point in module load order. A higher value indicates that the module will be loaded later.
In the onLoad method, You can add any code that need to be executed any time your module is loaded after any incoming request.
For example, you can bind your custom classes in the services container or listen globally to any events using the Event Manager.
Frontend folder
All client files are saved in two main folders - templates, where all module templates files are stored, and src that contain logic that will run on the client side.
Backbone.js framework is used. You can explore its documentation via this link: https://backbonejs.org.
The frontend is based on view trees. Every page is rendered by using multiple view objects, parent view objects may have child view objects, these may have their own child objects and so on. HTML Rendering of the page is started by the child views of the last level.
Here is the example of the view client/modules/example-module/src/views/test/record/detail.js:
    Espo.define('example-module:views/test/record/detail', 'views/record/detail',
        Dep => Dep.extend({

            // template file
            template: 'example-module:test/record/detail',

            // handlers of DOM events
            events: {
                'click a[data-action="save"]': function (e) {
                    console.log(e.currentTarget);
                }
            },

            // logic initialization
            setup() {
                // call parent setup method
                Dep.prototype.setup.call(this);

                // create child view with options parameters
                // rendering of parent view will be delayed until child view is loaded
                this.createView('someView', 'example-module/test/some-view', {
                    key1: 'value1',
                    key2: 'value2'
                });

                // listen model changing event
                this.listenTo(this.model, 'change', () => {

                });

                // listen model saving or fetching
                this.listenTo(this.model, 'sync', () => {

                });
            },

            // data that will be returned to template
            data() {
                let data = Dep.prototype.data.call(this);

                data.key1 = 'value1';

                return data;
            },

            // called after view is rendered
            afterRender() {
                Dep.prototype.afterRender.call(this);

                // get child view
                let child = this.getView('someView');

                if (child) {
                    // remove child view from DOM
                    this.clearView('someView');
                }
            }
        })
    );
This is an example of template file for the Detail View client/modules/example-module/res/templates/test/record/detail.tpl:
    <div class="some-class">{{key1}}</div>
    <a class="action" data-action="save">Save</a>
AtroCore enables you to define custom views for certain entity types. It must be set in app/Resources/metadata/clientDefs folder. Here is the example app/Resources/metadata/clientDefs/Test.json:
    {
        "controller": "controllers/record",
        "iconClass": "fas fa-square",
        "views": {
            "list": "example-module:views/test/list",
            "detail": "example-module:views/test/detail"
        },
        "recordViews": {
            "list": "example-module:views/test/record/list",
            "detail": "example-module:views/test/record/detail"
        }
    }
Detail view example-module:views/test/detail contains all panels, relations, header bar with buttons in the top-right corner.
Record detail view example-module:views/test/record/detail contains all the above except header bar.
List view example-module:views/test/list contains Record List view, header and Search row view.
Record list view example-module:views/test/record/list contains only rows of records.
Composer file
Composer file in the module root directory creates configuration for composer which looks like:
    {
        "name": "atrocore/example-module",
        "require": {
            "atrocore/core": "~2.1.3"
        },
        "autoload": {
            "psr-4": {
                "ExampleModule\\": "app/"
            }
        },
        "extra": {
            "atroId": "ExampleModule",
            "name": {
                "default": "ExampleModule"
            },
            "description": {
                "default": "Example Module."
            }
        }
    }
atroId contains the unique name of the module for its identification in the system. name and description are used to show the module in the section Administration > System > Update & Modules.
Module documentation
To make documentation available in the built-in docs portal, place a docs/ folder in the module root directory. The folder must contain at least an index.md file — this is the entry point that the system checks to detect documentation.
The docs portal is powered by Docsify and serves all Markdown files from docs/ via the /api/docs endpoint. Subdirectories are rendered as chapters in the sidebar. Numeric prefixes on folder names (e.g. 01.getting-started) control the sort order and are stripped from the URL.
Module Installation
Modules installation is carried out from the Module Manager located at Administration > System > Update & Modules page. To mark your module to be installed, you need to perform certain actions, which will be described below.
Module installation in AtroCore is based on Composer. You can get detailed information about Composer by the following link https://getcomposer.org.
Module store shows all available modules, which are registered in our repository.
In the future we will enable our solution partners to add your own modules to our module store. At this moment you can install your own module only by adding it as required in your composer.json file, that is stored in your project root directory.
In your git or other VCS repository add and commit the composer.json file. Structure of it described in this paragraph - Composer file.
Creating the first module release
To be able to install the module you need to create its first release.
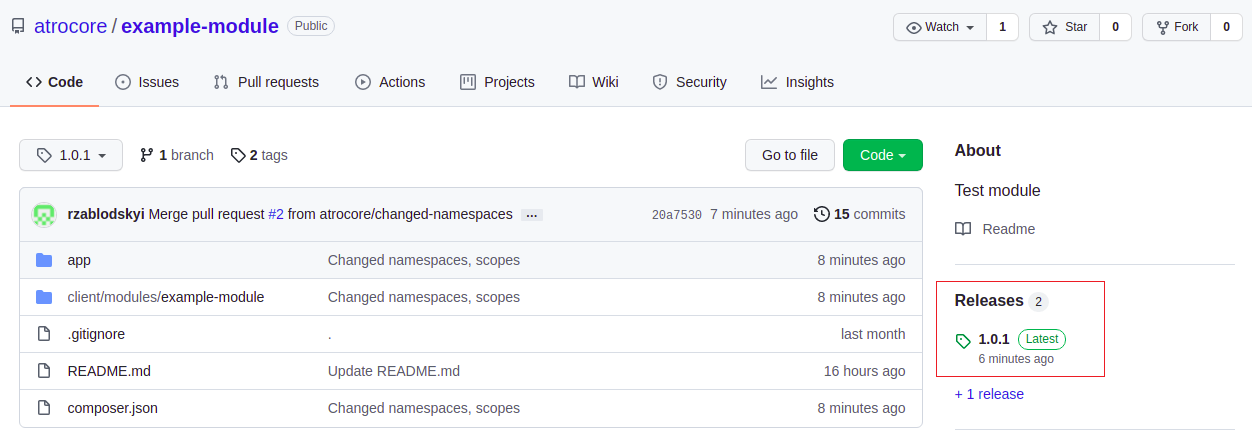
Then you need to add the repository containing your module. If your module is stored in a public GitHub repository, add next block in repositories section in the composer.json file:
    {
        "type": "git",
        "url": "https://github.com/atrocore/example-module"
    }
If you have a private repository you need to generate an access token for your GitHub account first.
Follow the link https://docs.github.com/en/authentication/keeping-your-account-and-data-secure/creating-a-personal-access-token to know about how create personal access token to GitHub.
When you will have the personal access token add the next section in repositories key:
    {
        "type": "git",
        "url": "https://username:usertoken@github.com/atrocore/example-module"
    }
where username - is your GitHub username, usertoken - is your personal access token you have created in the previous step.
Instead of using GitHub you can use any VCS. Follow the link to get more detailed information: https://getcomposer.org/doc/05-repositories.md#vcs
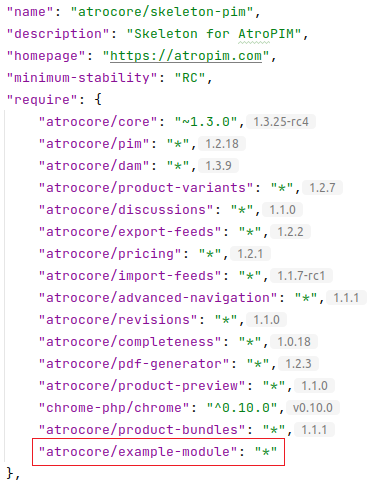
Add the module as required
Now in the project composer.json file in require section add your module package name.
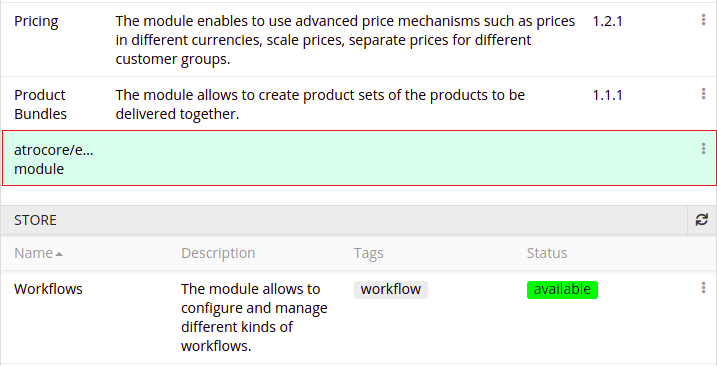
If you open Module Manager (Administration > System > Update & Modules) you will see that your module is prepared to be installed.
Click on Install and Update button or run php composer.phar update command from terminal to initiate the process. Your module will be installed and the system will be updated. If some error occurs during installation please check the logs in the folder data/logs for more detailed information.