The "Import Feeds" module enables you to import all the data for any entity in the AtroCore system, link related entities or even create data records for them, e.g. it is possible to import the product data together with the corresponding categories, brands etc. You can create, configure, and use many import feeds. Import feeds use AtroCore REST API, so all the data is automatically validated with the same rules, as if you would create all data records manually.
With the help of the "Import Feeds" module, data import may be performed in two ways:
- manually – by using some configured import feed directly
- automatically – by scheduled job.
You will be able to create a scheduled job for your import tasks only if the appropriate import feed type is available in your system. Such import feed types enable the system to download the data via URL, execute REST API call, make a query directly to the database and so on (premium modules are needed for this feature). With this free module you can manually import the data via CSV files. You can also code your own import feed types.
The following modules extend the functionality of the import feeds
- Import: Database – allows to import data from MSSQL, MySQL, PostgreSQL, Oracle, HANA databases
- Import: HTTP Request – allows to import data via HTTP Request, eg via REST API
- Synchronization – orchestrates multiple import and export feeds to automate the complex data exchange
- Import: Remote File - the module enables to automate the import feed execution for a remote file, which can be accesses via FTP, sFTP or URL.
- Translations – adds a functionality of the imported data automated or manual translation.
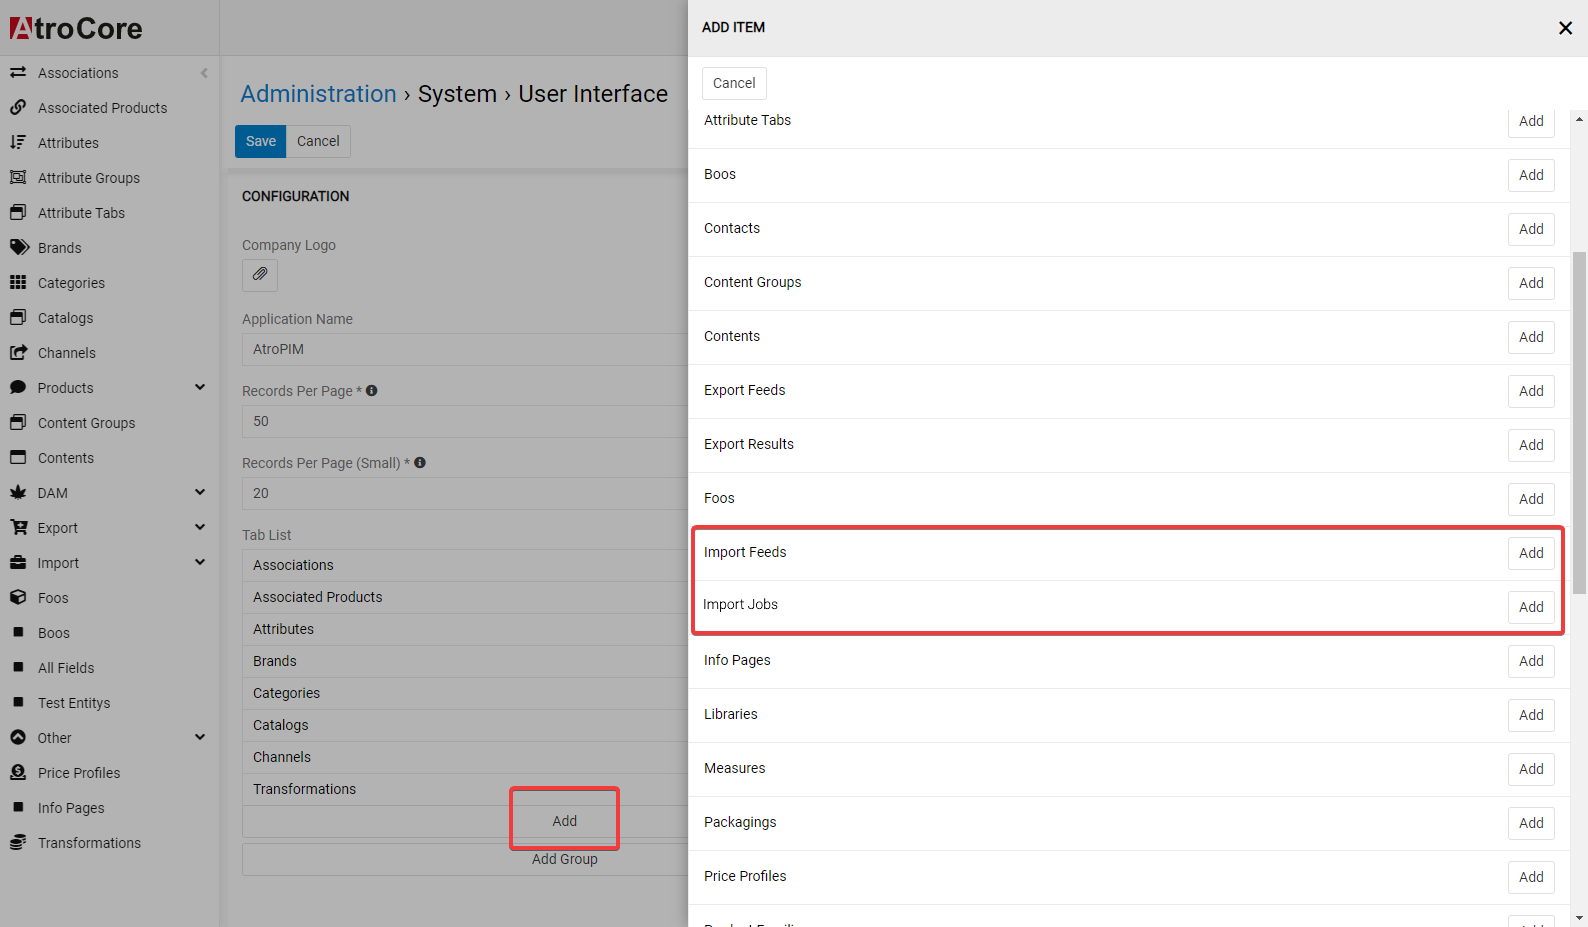
Administrator Functions
After the module installation two new entities will be created in your system - Import Feeds and Import Jobs. Via Administration > System > User Interface you can add these items to the navigation of your system if it did not happen automatically.
Access Rights
To enable import feed creation, editing, usage and deletion by other users, configure the corresponding access rights to the Import feeds and Import Jobs entities for the desired user/team/portal user role on the Administration > Roles > *Role name* page:
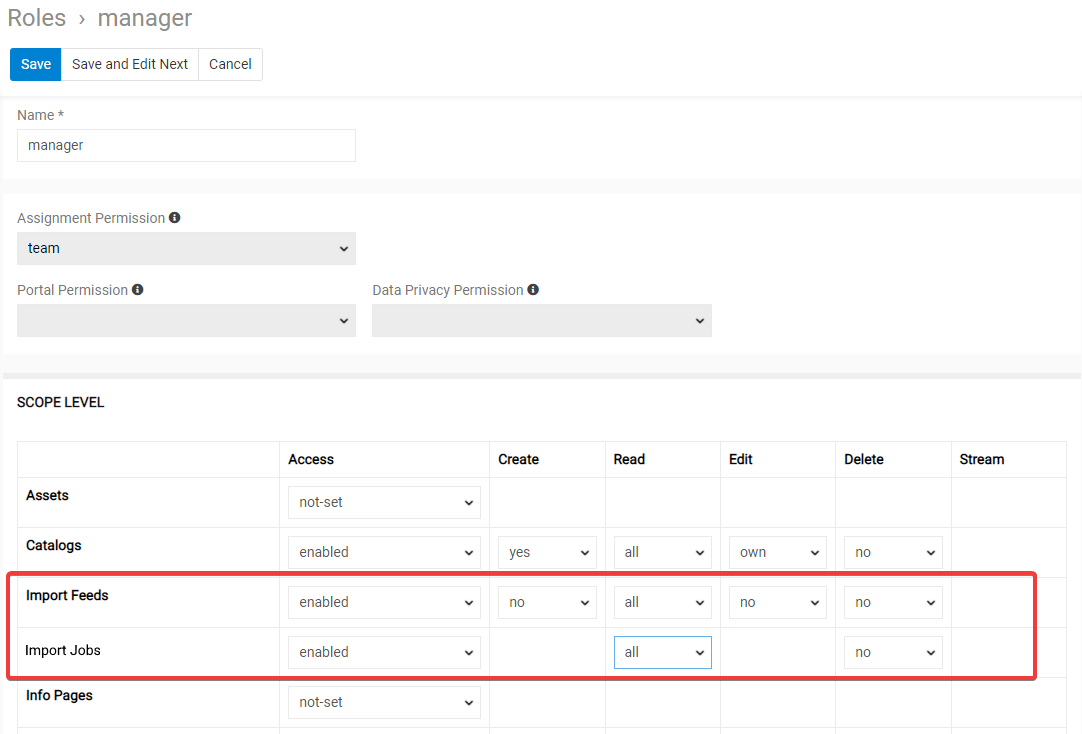
Please, note that enabling at least Import feeds read permission for the user is a required minimum for him to be able to run import feed.
User Functions
After the "Import Feeds" module is installed and configured by the administrator, user can work with import feeds in accordance with his role rights that are predefined by the administrator.
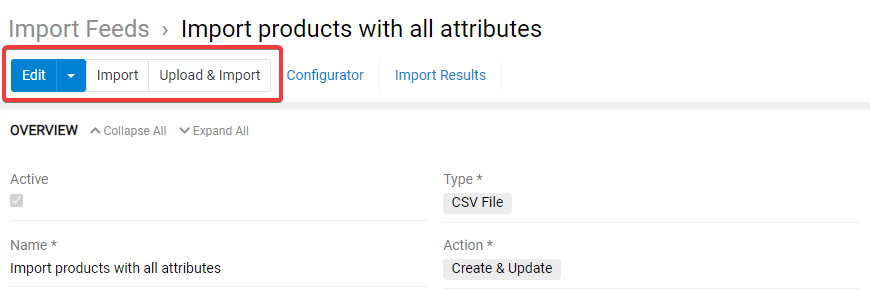
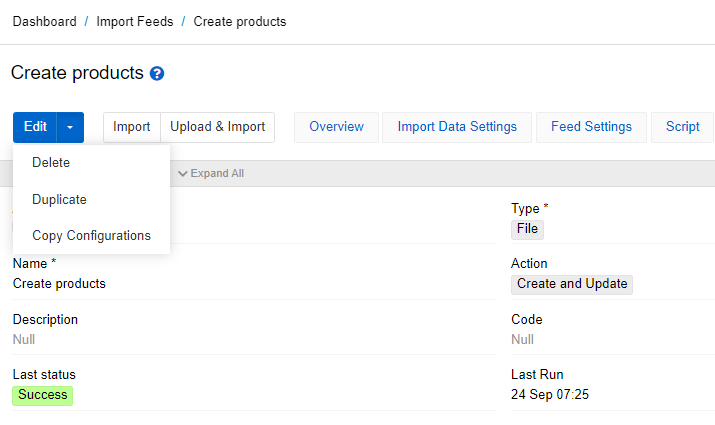
Import Feed Creation
To create a new import feed, click Import Feeds in the navigation menu and then click the Create Import Feed button.
If there is no
Import Feedsoption in the navigation menu, please, contact your administrator.
The standard form for the import feed creating appears:
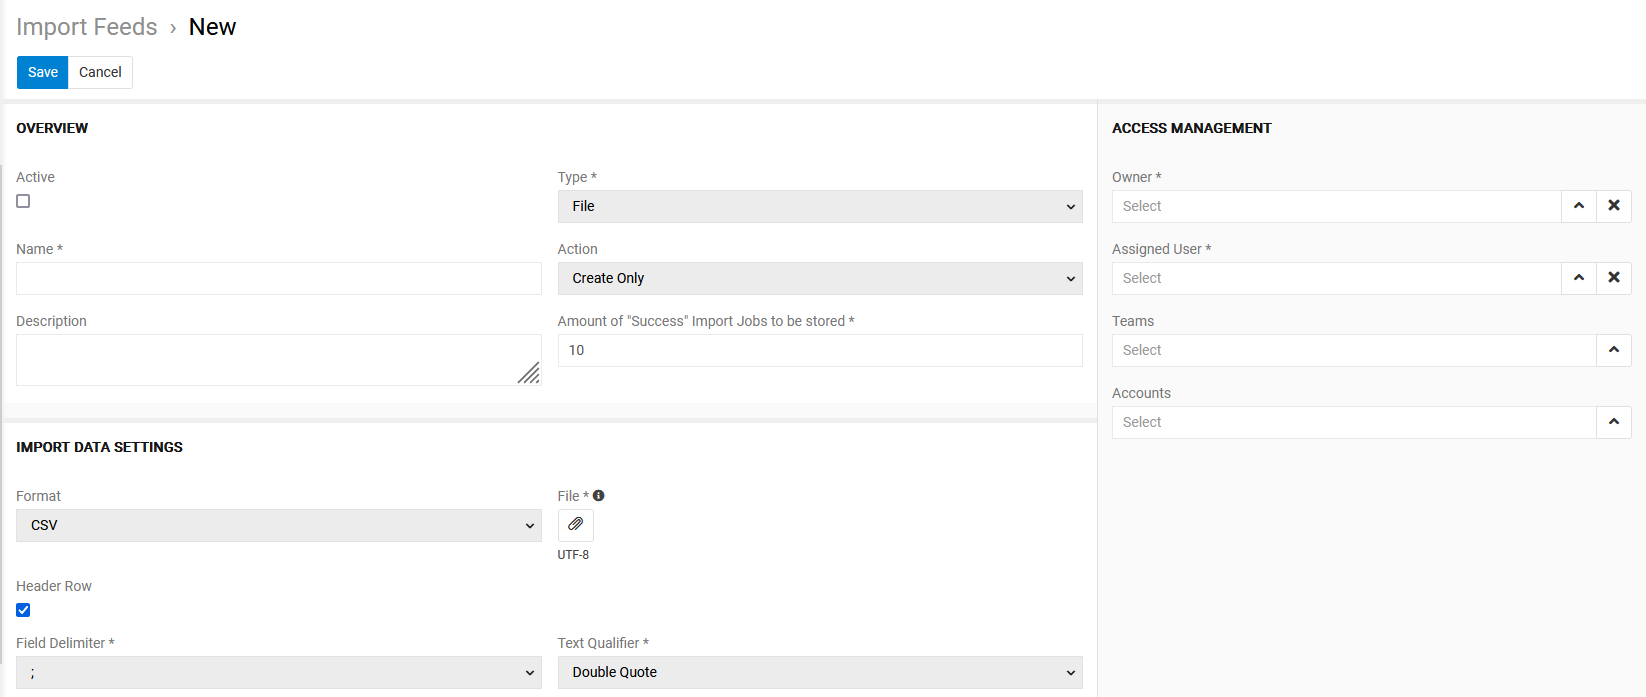
Here fill in the required fields and select the import feed type from the corresponding drop-down list. By default, the import feed type is File. In case you need to import the data from other sources, the corresponding modules installation is required.
Click the Save button. The new record will be added to the import feeds list. You can configure it right away on the detail view page that opens or return to it later.
Overview panel
Overview panel enables you to define the main feed parameters (name, action, activity etc):
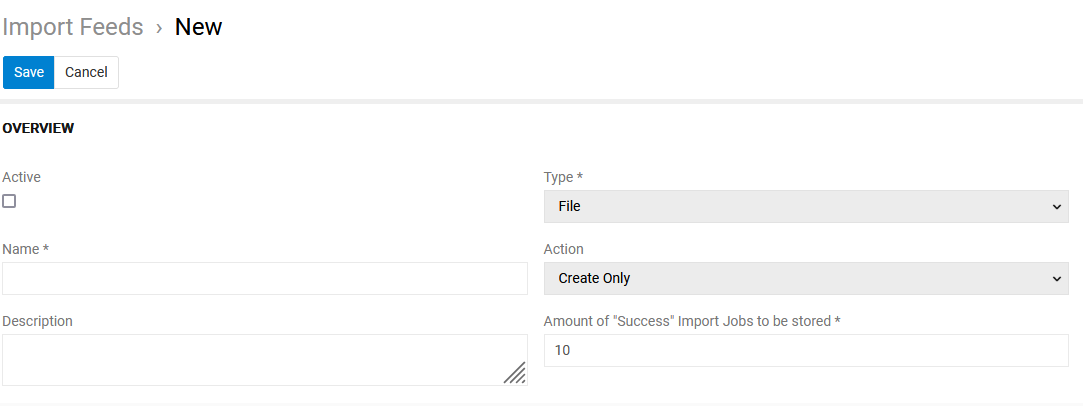
The following settings are available here:
- Active – activity of the import feed, import is impossible unless this checkbox is activated
- Name – import feed name
- Description – description of the import feed usage, can be used as a reminder for the future or as a hint for other users of the given import feed
- Type – the import feed type, cannot be modified later
- Code - import feed code, must be unique
- Action – define the action to be performed in the system during the data import:
- Create Only – only new data records will be created, existing data records will not be updated (even if some data is changed)
- Update Only – existing records will be updated, new data records will not be created (even if the import data have some new records)
- Delete Only for founded – existing records will be deleted, if records with the defined identifier come with the import data
- Delete Only for not founded records – existing records will be deleted, if records with the defined identifier does not come with the import data
- Create and Update – new data records will be created, and the existing records will be updated
- Create and Delete – new data records are created, and no the records no longer provided in the import data will be deleted
- Update and Delete – existing records will be updated and records with no longer provided IDs will be deleted
- Create, Update and Delete – full synchronization will be done.
- Amount of "Success" Import Jobs to be stored – you may specify how many successful import jobs you want to be stored in your system.
Import Data Settings
The import data parameters are configured on the IMPORT DATA SETTINGS panel:
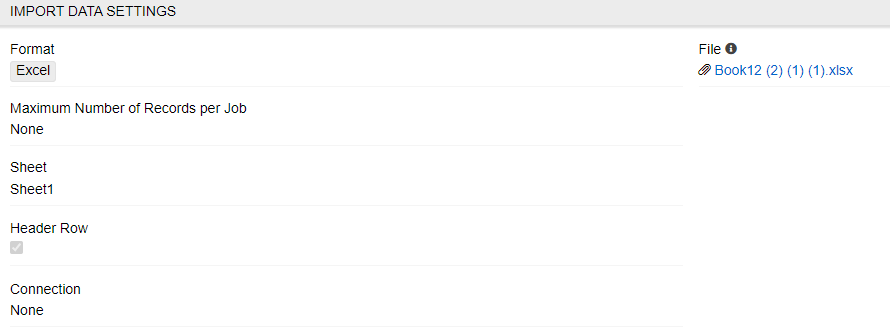
- Format – specify the format of the file from which the data will be imported. CSV File or Excel File types are available here.
- File – here you can upload the file which is to be imported or its shortened version (as a sample), which will be used for the configuration. The file should be UTF-8 encoded.
- Maximum Number of Records per Job – this allows you to select how many records to import in one job. The import feed is automatically split into parts consisting of no more records than the number specified here to speed up the import. If the parameter is empty, it will be ignored. Multiple jobs for large imports is preferable on slower systems.
- Sheet – here you can select a sheet of file which is to be imported or its shortened version (as a sample), which will be used for the configuration.
- Header row – activate the checkbox if the column names are included in the import file or leave it empty if the file to be imported has no header row with column names.
- Connection – select the connection if needed (if file is imported from a remote database for example).
If the XLS file is too large to import, you can convert it to CSV.
Feed Settings
The next panel is the settings panel:
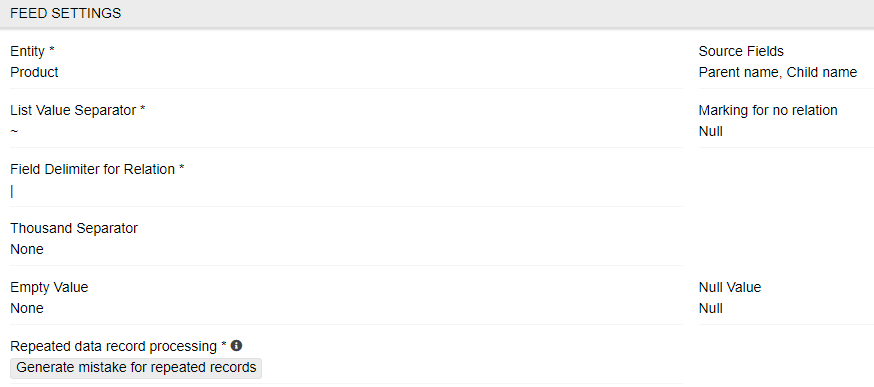
- Entity – select the desired entity for the imported data from the drop-down list of all entities available in the system.
- Source Fields – this field is initially empty. After uploading the file you will see here the list of available columns from the imported file.
- List Value Separator – is the separator to split the values in the list (eg for "multienum" or "array" fields and attributes).
- Marking for no relation – this mark is only available for the product entity. This symbol marks relation which should not be linked to the respective product.
- Field delimiter for relation – field delimiter, which is used to separate fields in the relation, default value is "|".
- Thousand separator – define the symbol, which is used as thousand separator. This parameter is optional. The numerical values without thousand separator will be also imported (eg both values 1234,34 and 1.234,34 will be imported, if "." is defined as a thousand separator).
- Decimal mark – select the used decimal mark, usually
.or,should be defined here. - Empty Value – This symbol will be interpreted as "empty" value additionally to the empty cell, eg "" and "none" will be interpreted as "", if you define "none" as an empty value.
- Null value – this value will be interpreted as "NULL" value.
- Skip value - this value will be skipped on import, regardless of whether it is a field or a relation.
- Repeated data record processing – in this field, you choose how the system reacts to duplicate records. You can choose to skip duplicate entries, allow them, or generate an error if they occur in the file. If you allow duplicate entries, for a the feed of type "Update", the existing data will be replaced with the last processed value. If your feed allows creating new records, both duplicate records will be created.
Please, note that the defined
field delimiter,list value separator,empty value,null value,thousand separator,decimal mark,text qualifierandmark for a non-linked attributesymbols must be different.
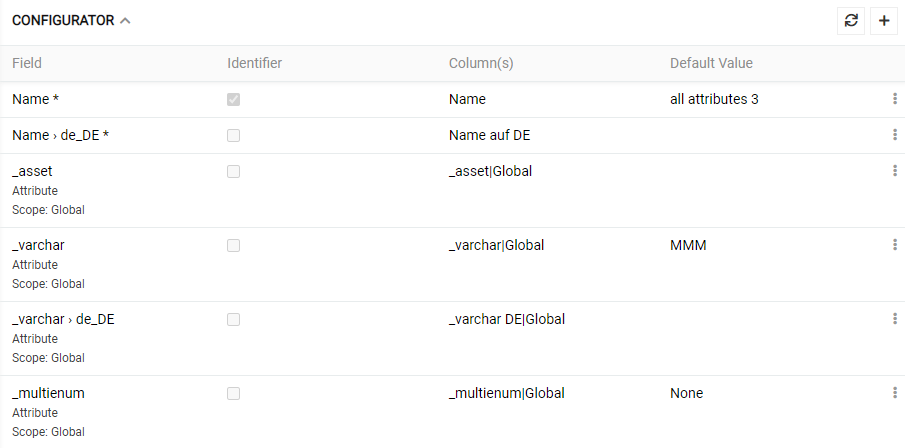
Configurator
Configurator can be used after the import feed is created. Initially this panel is empty. This panel displays mapping rules for your data import.
To create a new entry, click on the + icon in the upper right corner. A popup window appears.
Overview
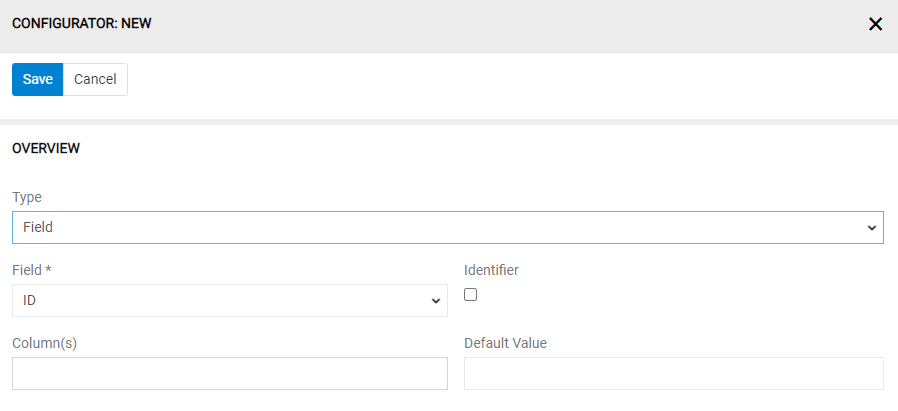
- Type – choose the type of your mapping rule by selection "Field" of "Attribute" in the field
Type. This option is available only for product entity. Other entities don't have attributes, only fields.
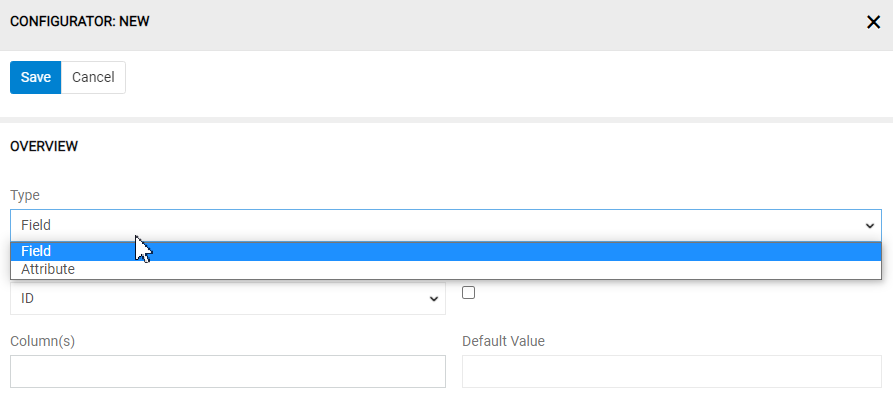
- Field – choose the field for your selected entity field for data to be imported from the selected column(s).
- Identifier – set this checkbox if the value in the selected column should be interpreted as an identifier. You can select multiple columns as identifier.
- Column(s) – depending on the type of the selected entity field you can select one, two or multiple columns here.
- Default Value – you can specify the default value to be set, if the cell value is "", "empty" or "null".
- Create related data record - this checkbox appears if you set an entity into the
field. If this value is true, new data record for related entity will be created, if nothing is found based on provided data.
Please note, a certain column can be used multiple times in different rules.
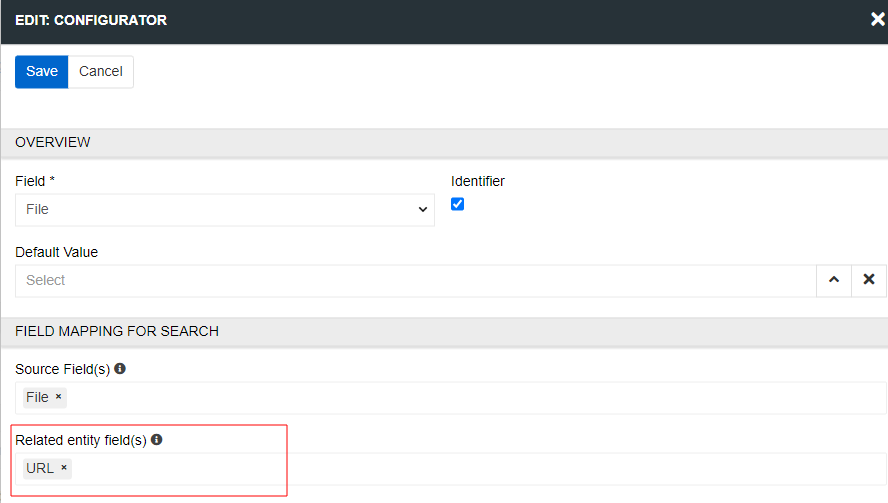
File Mapping For Search
- Source Field(s) - here you may specify the field value(s) that will be used to search if related data record already exists.
- Related entity field(s) - choose related entity field(s) in your system, which should be used to search in based on the data provided in the select field "Source Field(s)". If only one data field is provided the "Field Delimiter for Relation" may apply. In other cases the amount of provided data fields and "Related entity field(s)" should be the same.
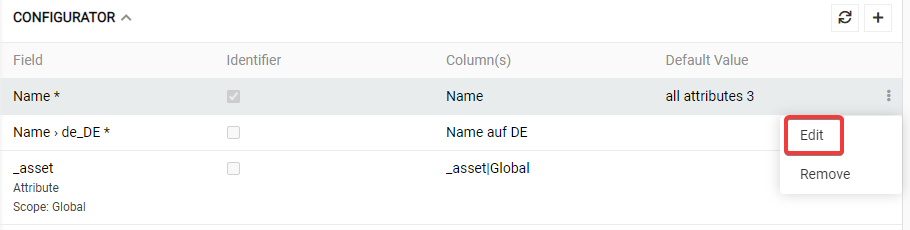
To modify the mapping rule displayed on the Configurator panel, use the Edit option from the single record actions menu. Here you can also delete the selected rule.
Identifier
For each field you can define whether it is the identifier or not. All identifiers are used together in search for a data record in the database. E.g. if you choose "Name" and "Brand" as identifier for an import to the product entity, the system will try to find such a product by using the cell values for these two fields. If some data record is found, it will be updated with the values which come from the import file. If more than one data record is found, you will get an error and import will not be executed.
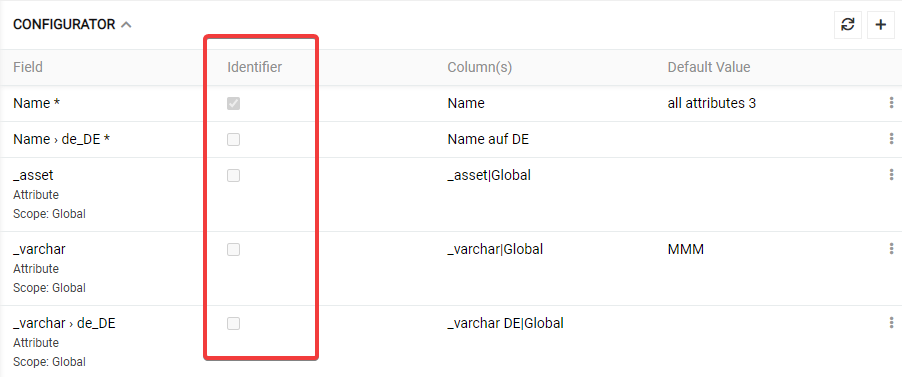
Please note, that, if you have not selected an identifier, you can not update data. System will not search for a data record in the database so it will only create new records if possible (You can see such example on the pictures below).

Default Value
For any mapping rule the column(s) or default value or both should be filled. Thus, it is possible to set the default value without choosing the column(s). In this case this value will be applied to all data records. For example, you can set a value for a "Catalog". If you would import product data, all the products will be automatically assigned to the selected catalog, even if you import file have no column for a "Catalog". If "default value" is left empty or no value is set, no default value will be applied as value.
Attributes
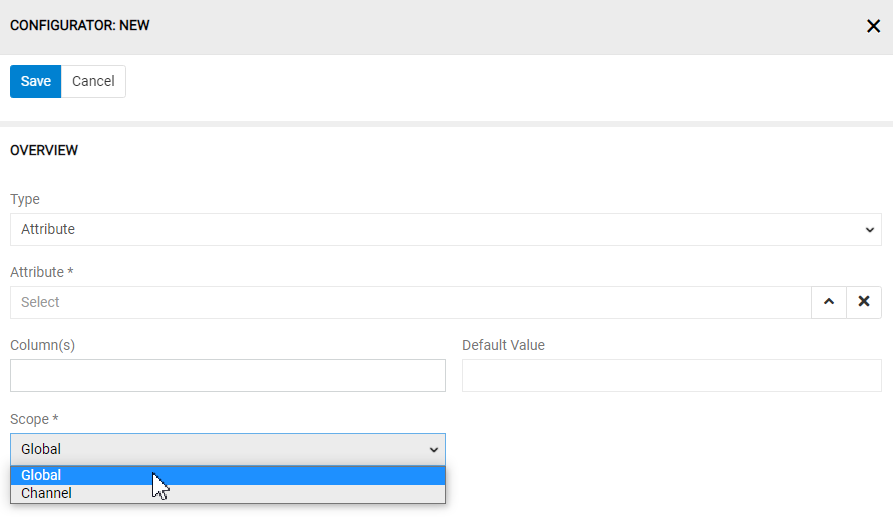
Only product entity has attributes. All products have the same fields but may have different attributes (attribute can be seen as a dynamic field). Only attributes can have channel-specific values. To create a mapping rule for some attribute you need to select by "Type" "Attribute" as a value. Set the Scope to "Global" if you want that the value to be imported should be set as a global attribute value. If you want that this value for the attribute should be set as a channel-specific value, you need to set the "Scope" to "Channel" and select the appropriate channel in the next field.
Marking attributes as not linked
You can import product data for product fields and product attributes simultaneously. In this case product fields and product attributes will be columns in your file to be imported. If you would use "", "empty" or "null" value for an attribute, it is impossible to identify, whether this product have this attribute with no value, or doesn't have this attribute at all. You can use the mark for a non-linked attribute to mark explicitly the attributes which should not be linked to a certain product. Per default "--" is used. Let's check the example.
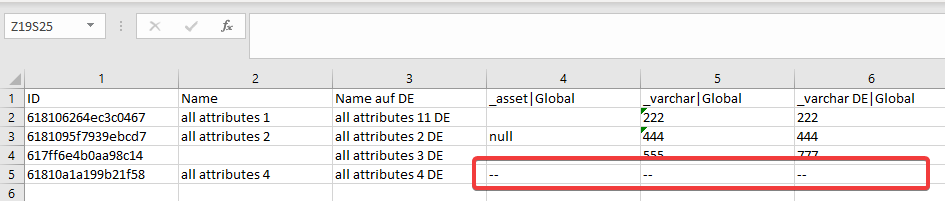
According to this example the product "all attributes 4" will not have the attributes "_asset", "_varchar" and "_varchar DE" linked to it.
"Boolean" fields and attributes
By importing “Boolean” fields or attributes "0" and "False" regardless case (uppercase, lowercase) are interpreted as FALSE value. "1" and "True" regardless case are interpreted as TRUE value. If NULL value for “Boolean” field or attribute is not allowed "" and "empty" value are also interpreted as FALSE value.
"Multienum" fields and attributes
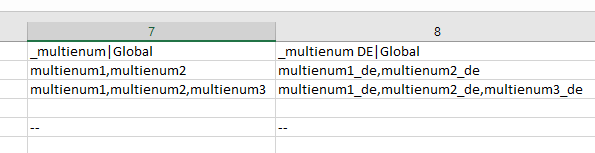
You can import "multienum" values for fields and attributes by separating its values with help of data record delimiter. In our example we use "," symbol for it.
 .
.
Only predefined values can be accepted, if your "multienum" field or attribute have predefined options. If one of the "multienum" values, provided in the file to be imported, is not valid, the whole row will not be imported. If your "multienum" field or attribute have no predefined options any value will be accepted.
Please note, if you want to import values for a multilingual enum or multienum field or attribute it is enough to import the value only for one language. Values for all other languages will be set automatically because the list values for different languages are linked with each other.
Currency and unit fields and attributes
Fields and attributes of currency and unit types have values which consist of two parts – the first one is of a "float" type and the second one is of "enum" type, which are separated by space symbol. Thus, examples of valid values are "9 cm", "110,50 EUR", "100.000 USD", "3000 EUR" etc.
Data for currency and unit fields and attributes can be provided in one or in two columns. If you specify two columns in the "Column(s)" field the numeric value will always be expected in the first column and the currency or unit name in the second column.
If only one column is specified, the whole currency or unit value is expected to be in this single column.
Also, the default value consists of two parts. It is possible to save only currency or unit name as default, without storing any value. In this case this value will be applied, if no currency or unit name is found in the columns set in the "Column(s)" field. So if for example only "123" is provided and "EUR" is set as default currency. The value to be stored will be "123 EUR".
Relations
Each entity may have one-to-many, many-to-one or many-to-many relations to other entities. Import feeds module enables to import data with direct relations of all types. Data record from the related entity can be found and linked or new data record for the related entity can be created and linked. Each relation is available for configuration as a field. To create a mapping rule for a relation you need to set the "Type" of your mapping rule to "Field" and choose your relation’s name as a "Field". Let's configure a "Brand" relation. So, we choose "Brand" in the "Field" field and "Brand" in the "Column(s)" field. For a relation we also need to select the related entity fields, we choose ID, Name, Name in German, Active and Code.
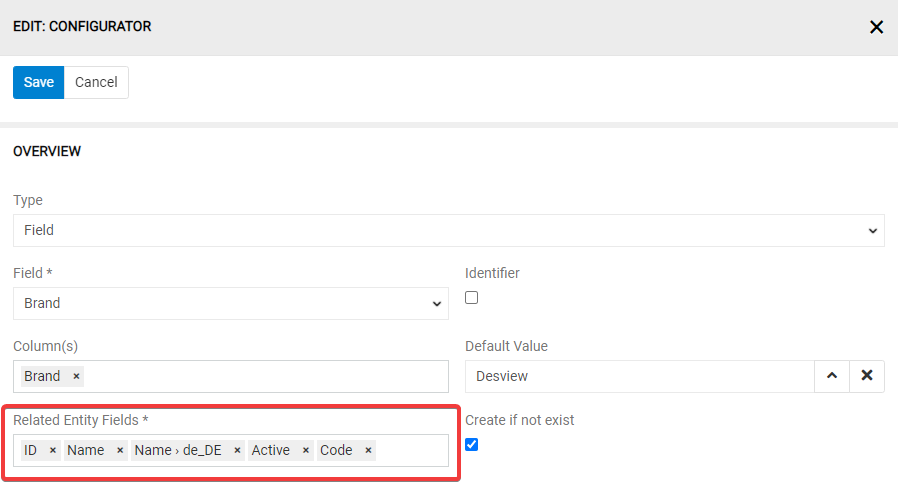
We also want the brand to be created if it is not found in our system. That is why we set the checkbox for the option "Create if not exists".
The cell "Brand" in your CSV file should look as follows:
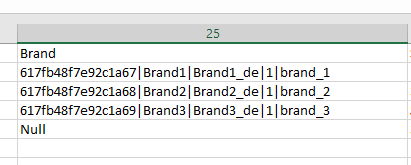
All field values should be separated by the "Field delimiter for relation". Per default pipeline symbol "|" is set as a field delimiter for relation.
If "Brand1" exists it will be found and linked. If "Brand2" doesn't exist it will be created and linked with appropriate product record.
ID is here not required. You can use only "ID", if all the brands already exist in your system. You can select only "Name", "Name in German", "Active" and "Code", if the brands are not available in your system and should be created by the import. In this case "ID" will be created automatically. Please note, records for brands will be created only in the case, if "Name", "Name in German", "Active" and "Code" are the only required fields for the brand entity.
The system uses all related entity fields to search for the relation. If no relation is found and the checkbox "create if not exists" is not set the relation will be ignored – no relation will be created.
The amount of the configured related entity fields should be less or equal to the number of values for the relation in the cell. For example, if you choose only "ID" and "Name" as related entity fields the data will be still imported and only these two values will be used to search for a category.
If the new data record for the relation cannot be created, the system will generate an error and the system will import nothing from the respective row.
Multiple Relations
Multiple relations work like simple relations. The only difference is, that you can create multiple relations at once. Multiple data records for the related entities should be separated by using data record delimiter. For example, products are linked with categories via many-to-many relation, which means that some product can be assigned to different categories and some category may have many products assigned to it. For example, we can import product data together with categories as follows:
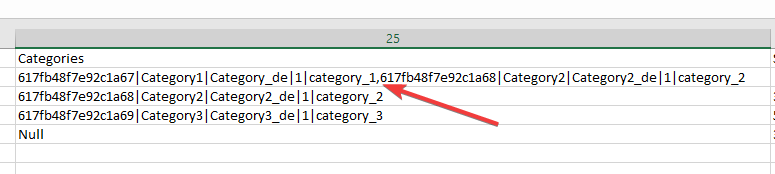
Following related entity fields should be set in the mapping rule "Name", "Name in German", "Active" and "Code" for the data to be successfully imported.
According to this example the product from the first data row will be linked with "Category1" and "Category2", here the "," symbol is used as data record delimiter.
The second and the third product will be linked with "Category2" and "Category3" respectively. Data record for "Category2" will be created only once (if it does not exist in the system), during creating/updating the first product, and linked with the first and the second product.
If any of the multiple relations cannot be found and the data record cannot be created (assuming the checkbox create if not exists is set) the whole row is not imported. If the option create if not exists is not set, all not found relations are ignored.
Please note, for all relations including Assets the system expects all related entities to be always provided, in other case not provided relations will be unlinked. Example: Product A is linked with the Category A, via import feed your provide Category B and Category C as relations for this product. After the import Category B and C will be linked with the Product A, and Category C will be unlinked, because it was not provided in the import file.
Related Files, Fields and Attributes of type File
Images, videos, and other types of files can be configured for import the same way as a relation. If you want to import files from provided URLs, you need to choose URL as related entity field. If you have images in multiple columns create a mapping rule for each column separately. You can also upload filed directly to the system and then link them to products using an import feed.
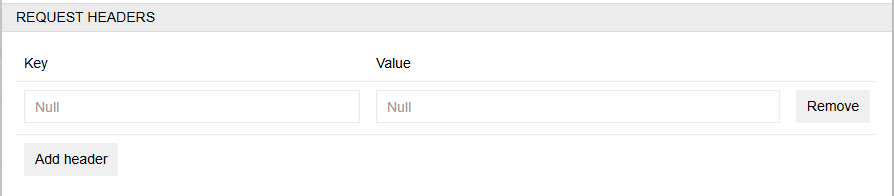
If you need to enter an additional key to import files via URL, use the Request headers field. This field is available for all import types. Here you can enter an additional token needed to download the files. Enter the required values in the Key and Value fields and click the Add header button.
Configuration for the fields and attributes of type "File" is the same.
It is possible to import images and other file types via providing URLs and link them directly with products. Create an import feed for product entity for this. Configurator rules for Files should use the field "Files" and for Main Image – the field "Main Image".
If you want to import the product data and need to mark some file as a Global Main Image, the URL of this image should be provided for the Product Field "Main Image". The Configurator Rule for Main Image should be created after the rule for all other files, in other case the Main Image will not be imported. Configuration Rule for "Main Image" is the same as for "Files" Relation. It is always better to import all the files and the Main Image via single import job, in other case the importing order is important (see details bellow).
If you import some files without files for Main Images and your products have already Main Images assigned to them, these will be unlinked. To avoid this you need to include a Configuration Rule for the files which are Main Images. The reason for it is simple, the system (imports and) links only files to the products which are provided in your import file, all other files are unlinked. So if you have some files assigned to you products and will import products with completely different files, all previously linked files will be unlinked.
If you create a rule only for Main Images and there will be no rule for other files, files for the Main Images will be created and linked additionally. All other files will be preserved. The importing order is important. You can import files and then import Main Images - in this case all imported files will be linked to the products. If you will import Main Images initially and than all other files, without using a rule for files, which are assigned as Main Images, all the Main Images will be unlinked.
Marking an Image as a Main Image for a certain channel via import is currently not possible.
Import of files via local server path is currently not supported.
Running Import Feed
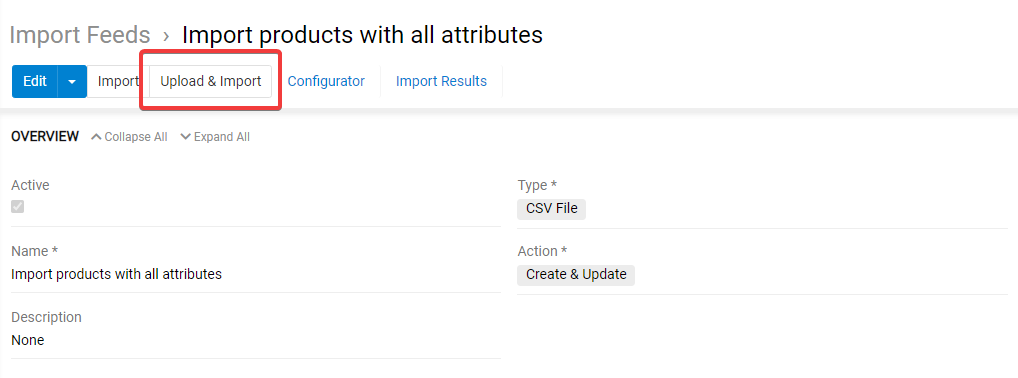
Click on Import button to import the data from the file, which you have uploaded during configuration of your import feed (which is a sample file).
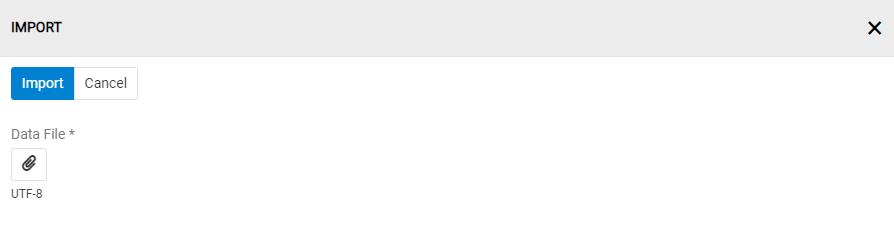
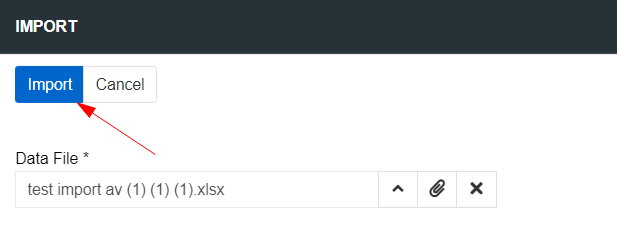
Alternatively, you can import the data from a new file. Click on the Upload & Import button.
In the pop-up that appears you can upload your new CSV file, which should be UTF-8 encoded and have the same structure as you sample file. Click on Import button to start the process.
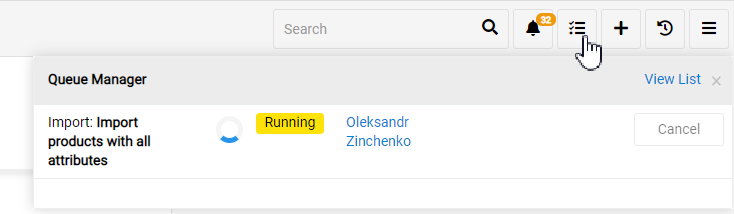
Started import job is added to the Job Manager, where you can see the current status:
If any errors arrive during export they will also be shown in the Job Manager.
The new record is also added to the "Import Jobs" Panel with the state Pending. After the import job is successfully completed the state will be automatically changed to Done.
While the import is running you may cancel it in the right-side menu:

You can also see last time import feed was executed and status of the last job executed in import page.

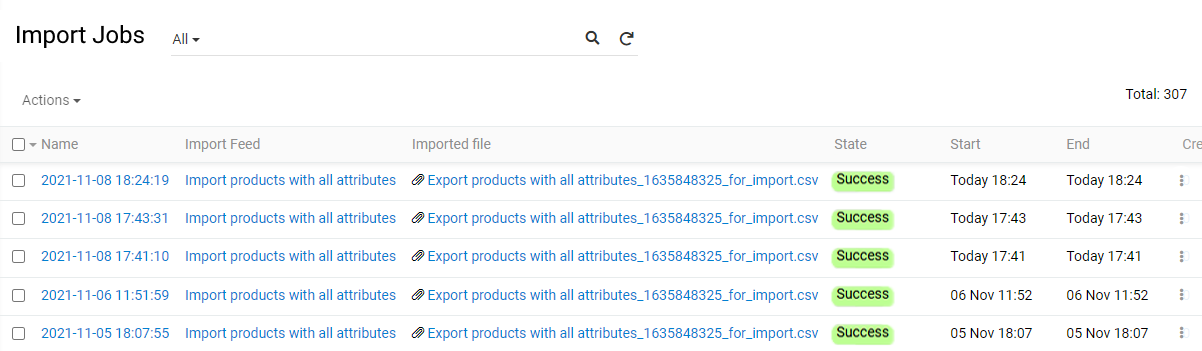
Import Jobs
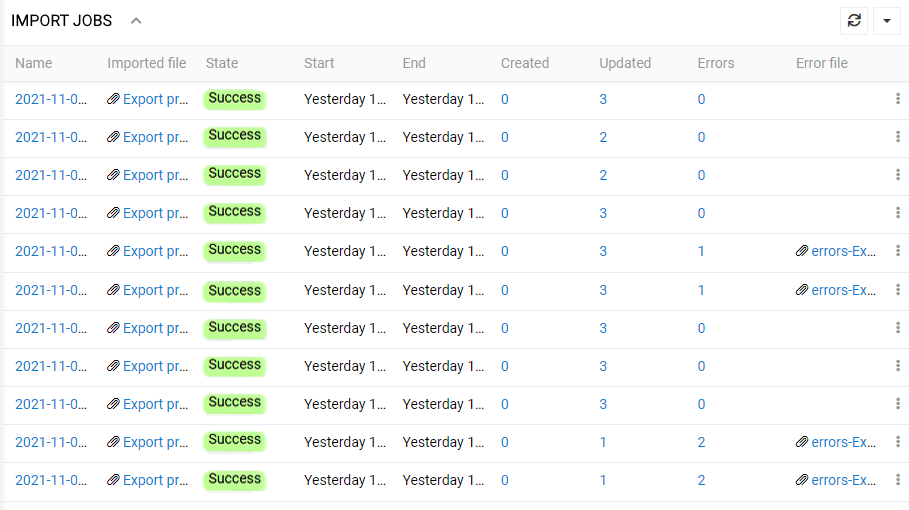
Information about completed import jobs is displayed on the Import Jobs panel, which is empty on the import feed creation step but gets filled in after the data import is performed via the given import feed.
Results of the data import can be viewed in two ways:
- on the "Import Jobs" panel of the respective import feed, which shows the details on the import operations performed via the currently open import feed:
- on the "Import Jobs List Page", which shows details on all import jobs performed in the system via import feeds. To open this page, click on the
Export Resultsin your main navigation
The Import Jobs details contain the following information:
- Name – the Import Job record name, which is generated automatically based on the date and time of the import job start. Click the Import Job record name to open its detail view page.
- Import feed – the name of the import feed used for the import job. Click on the import feed record name to open its detail page.
- Imported file – the name of the data file used for the import operation. Click the imported file name to open it or click the download icon to download the file.
- State – the current status of the import operation.
- Start – the date and time of the import job start.
- End – the date and time of the import job end.
- Created – the number of records created as a result of the performed import job. Click on this value to open the list view page of the corresponding entity records filtered by the given Import Job, i.e. with the
Created by importfilter applied. - Updated – the number of records updated as a result of the performed import job. Click on this value for the desired Import Job to open the list view page of the corresponding entity records filtered by the given Import Job, i.e. with the
Updated by importfilter applied. - Deleted - the number of records deleted as a result of the performed job.
- Skipped - the number of records skipped in the current import.
- Errors – the number of errors, if any, that occurred during the import job. Click on this value for the desired Import Job to open the list view page of the Import Job log records, where you can see the details on all errors.
- Error file – the name of the CSV file that contains only rows with errors, which were not imported. The error file name is generated automatically based on the imported file name. Click on the error file name to download it.
Note that while import is running, the counters do not display the number of records created, updated, or deleted. In order to see the counters' values at the current time, you need to click the
Refreshbutton next to the desired record in the import jobs panel.

The following States are available:
- Running – for the currently running import job.
- Pending – for the import job, which is next in line for execution.
- Success – for the successfully finished import job, regardless of containing errors.
- Failed – for the import job that could not be performed due to some technical issues.
- Canceled – for the import job that has been stopped by the user.
You can use the data record action menu to view details of the respective import job or remove it.
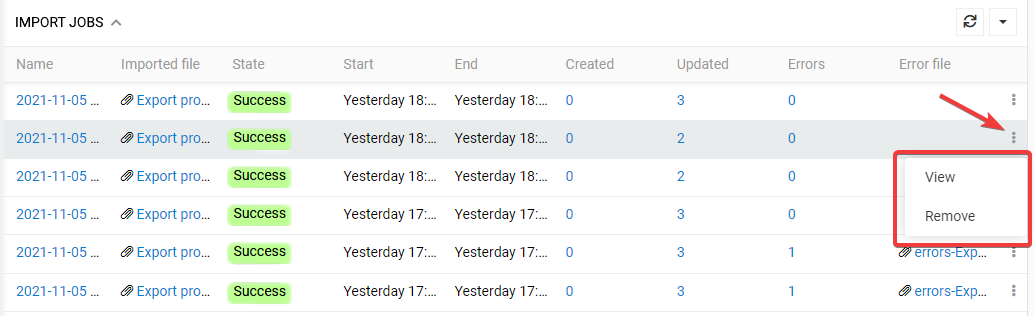
For the Failed or Canceled jobs you can select 'Try again' option.
Import Job Details
To view the Import Job record details, click on its name in the "Import Jobs" record.
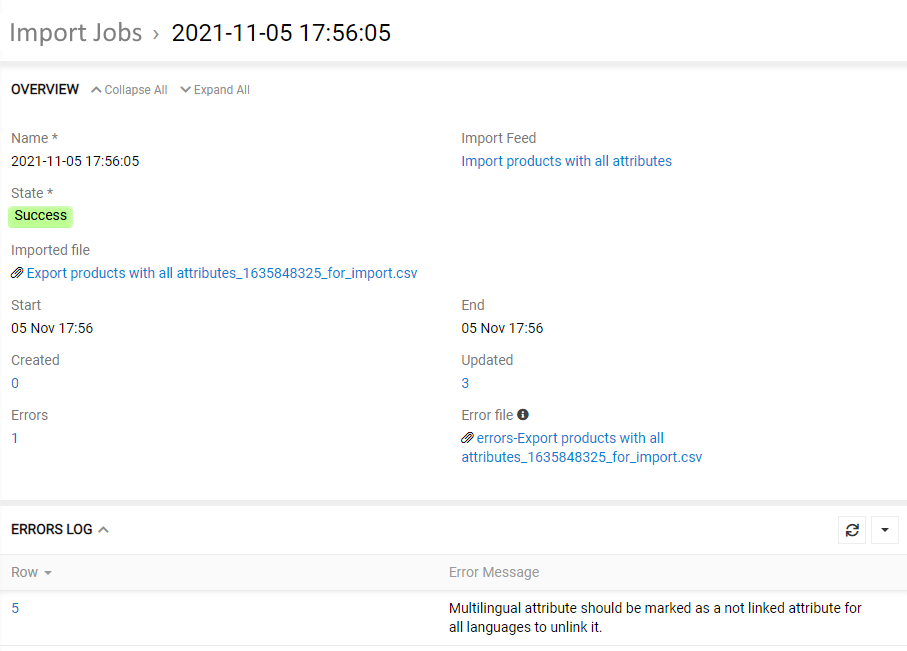
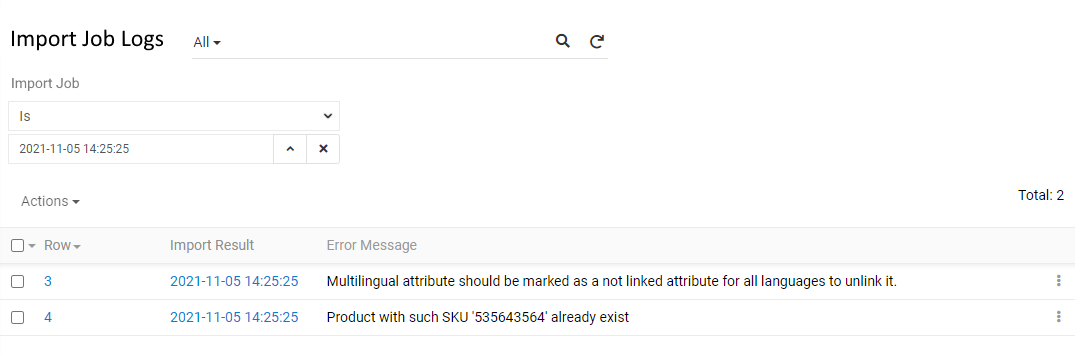
The error messages, if any, are displayed on the ERRORS LOG panel on this page.
To see a full list of error records, use the Show Full List action menu command. The errors will be displayed grouped by your current import job.
Use option Recreate in the record menu to reimport a specific job without reimporting the entire feed. For example, if you were importing products with attributes and only one attribute was imported with errors, you don't need to restart the entire import.
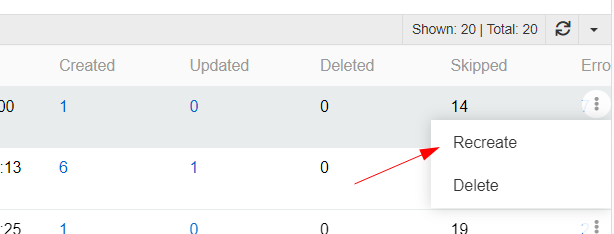
To reimport an imported job, select the desired job, click Recreate, upload a new file, and click on the Import button. After that, a new record will be created in the Imported Jobs panel.
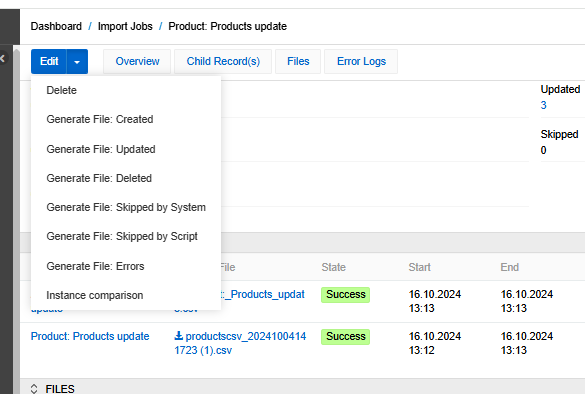
Generate files with import results
Imported file can be downloaded, e.g. to check what exactly was imported, if you click on the file name in your Import Jobs record. You can also download the converted file from the import job to get the modified data that was imported taking into account the import script.
For each Import job, you can download files with created, updated, and deleted records, as well as a file with products that were skipped by the import script or by system, or a file with import errors.
To generate the file, click on the record action menu of the job and select the file you want.
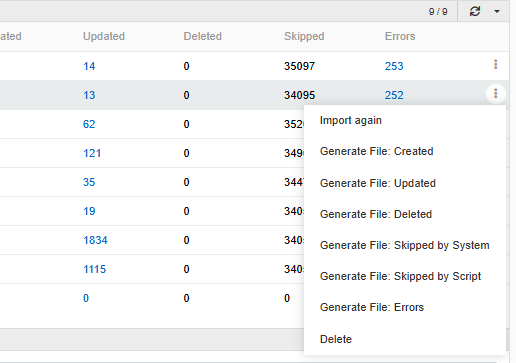
The required file will be downloaded to your device immediately after generation. It will also be automatically uploaded to the Files panel of the corresponding Import job.

You can also generate these files from the detail page of the import job by clicking on the action menu. Please note that when you delete a job, all generated files will be deleted as well.
Error File
Data to be imported is automatically validated with the same rules, as if you would add this data manually. If your import file has no value for some required field error will be generated. Other examples of not valid data are usage of wrong data types (e.g. "Boolean" value is expected and some "string" is transferred, "integer" is expected, "float" is transferred), missing links, etc.
Please note, you will be able to import data with empty required fields if you use "completeness" module and "completeness" is activated for the chosen entity.
Import job is done row by row. It means the whole row is either processed in full or is completely not processed. In case of some error this line is added to the error file, which can be downloaded. Just click on its name for that. Error file contains only rows, which were not processed because of some error. The error message is always written in the last column of the error file.
Please note, first error occurrence is enough to stop processing of the certain row. So, in the error file you will see only one error message. It is still possible that this row can have more than one error.
After import job is done you can download the error file, correct your data in all rows, and reimport your data again by using the same import feed.
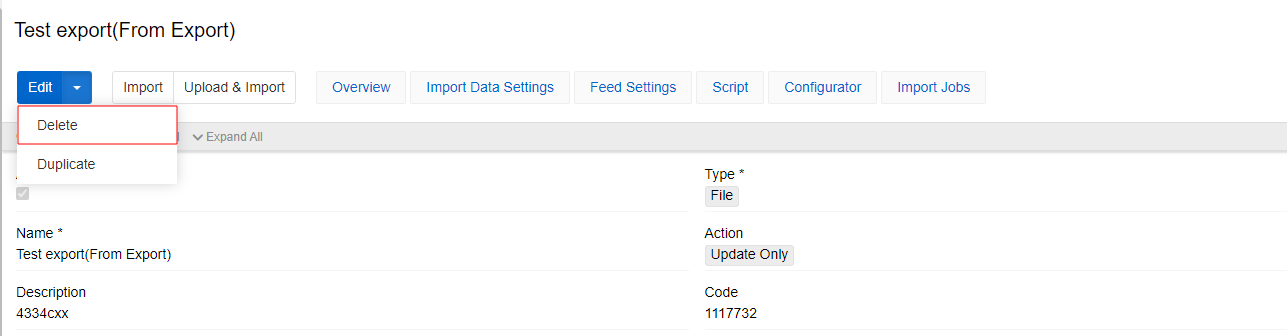
Import Feed Actions
To duplicate the existing import feed record, use the corresponding option from the actions menu on the detail view page of the desired import feed record:
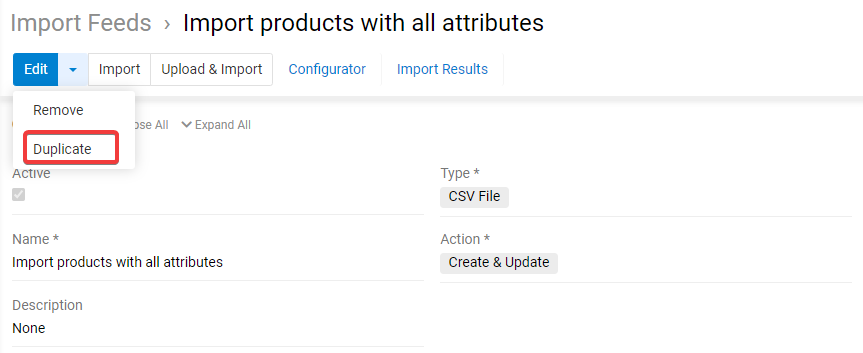
You will be redirected to the import feed creation page and get all the values of the last chosen import feed record copied in the empty fields of the new feed record to be created. After save the mapping rules from the configurator will be copied too.
To create import feed from export feed use the option Duplicate as import on export feed page:
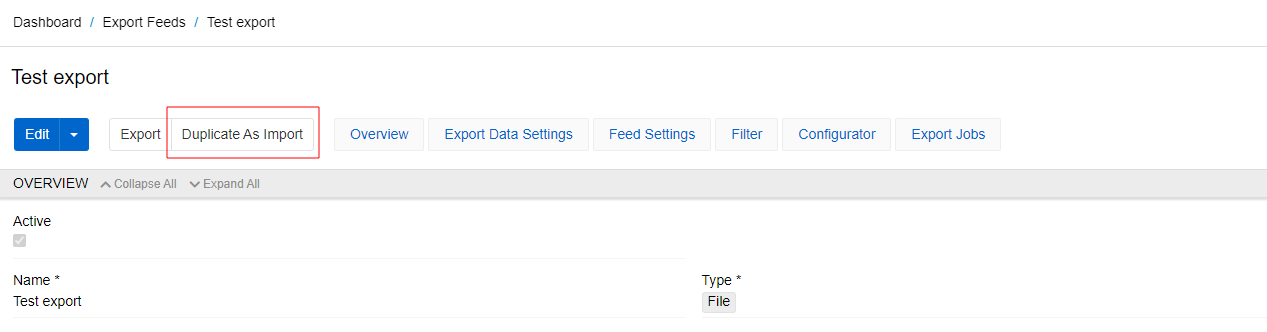
You will be redirected to the import feed creation page in the edit mode. All matching fields (such as description, code, file format, entity) as well as the mapping rules from the configurator will be copied from the import feed. If necessary, you can change the value of any of the fields, add or delete a mapping rule. The action field will be set as "update only" by default. You can change it to any other in edit mode. The name of the new import feed will be copied from the export one with the addition (From Export).
To remove the import feed record, use the corresponding option from the action’s menu of your import feed.
To copy configuration of the import feed as JSON, use option Copy Configurations
This option is available for all types of imports. Thus, you can create a feed via API with the same configuration using the Upsert command.