Table of contents
Export Feeds
The "Export Feeds" module enables the use of export feeds in a user-friendly manner. In general, export feed is a data export template that depends on the user needs and entity data to be exported from the AtroPIM system.
With the help of the "Export Feeds" module, data export from the AtroPIM system is performed in accordance with the export templates that can be further configured and customized, as well as reused at different time intervals.
Administrator Functions
The "Export Feeds" module significantly extends the functionality of the AtroPIM system, so further description of the module is given in the context of AtroPIM.
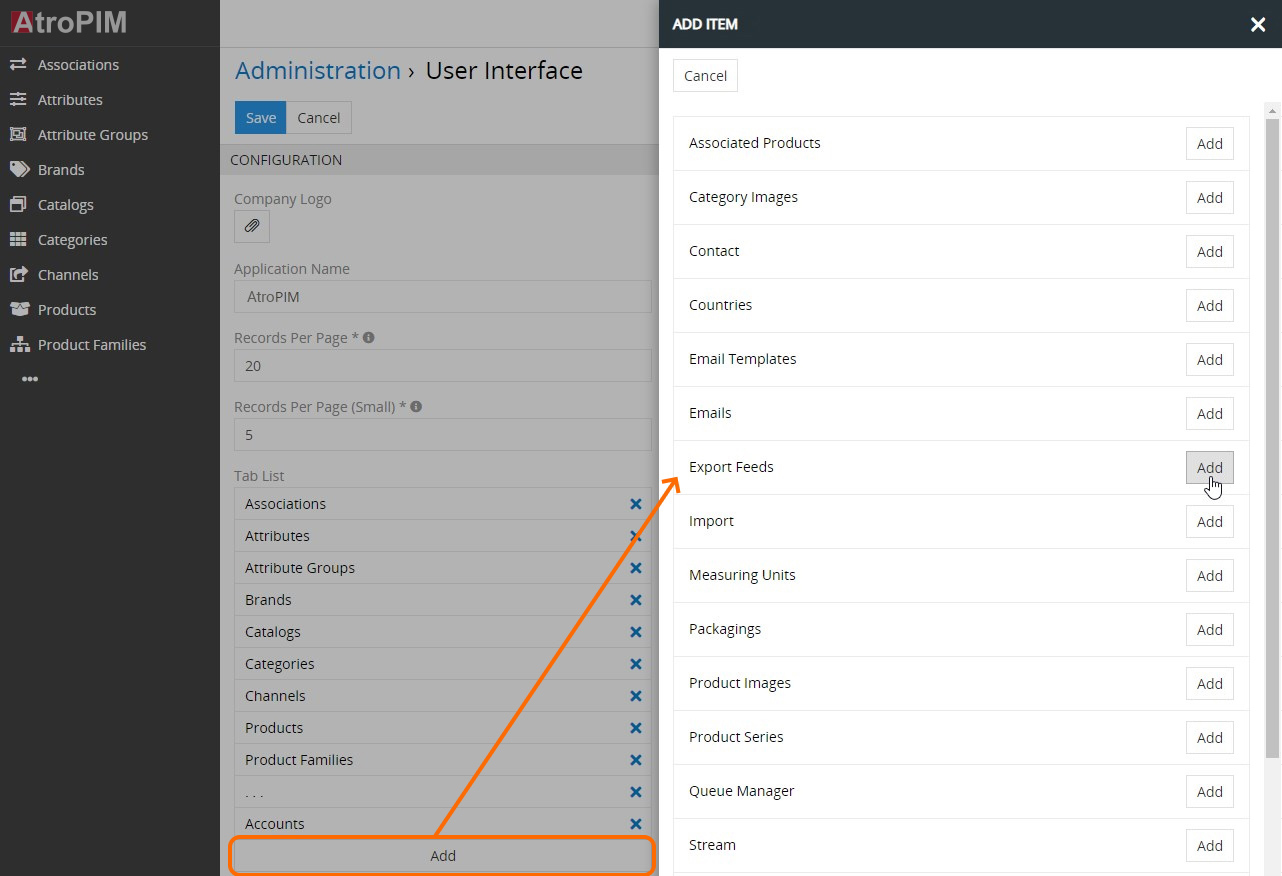
After the module installation, a new Export Feeds configuration group is added to the AtroPIM administration page. Also there is a possibility to add export feeds as a separate navigation menu item on the Administration > User Interface page:
The following modules extend the functionality of the export feeds
- Export: HTTP Request – the module allows to export data via HTTP request.
- Synchronization – orchestrates multiple import and export feeds to automate the complex data exchange
- Export: Remote File - the module enables to automatically or manually export data to a file on a FTP, sFTP or SSH server.
- Translations – adds a functionality of the imported data automated or manual translation.
Export Feed Creation
To create a new export feed click Export Feeds in the navigation menu and then click the Create Export Feed button. The common creation pop-up will appear:
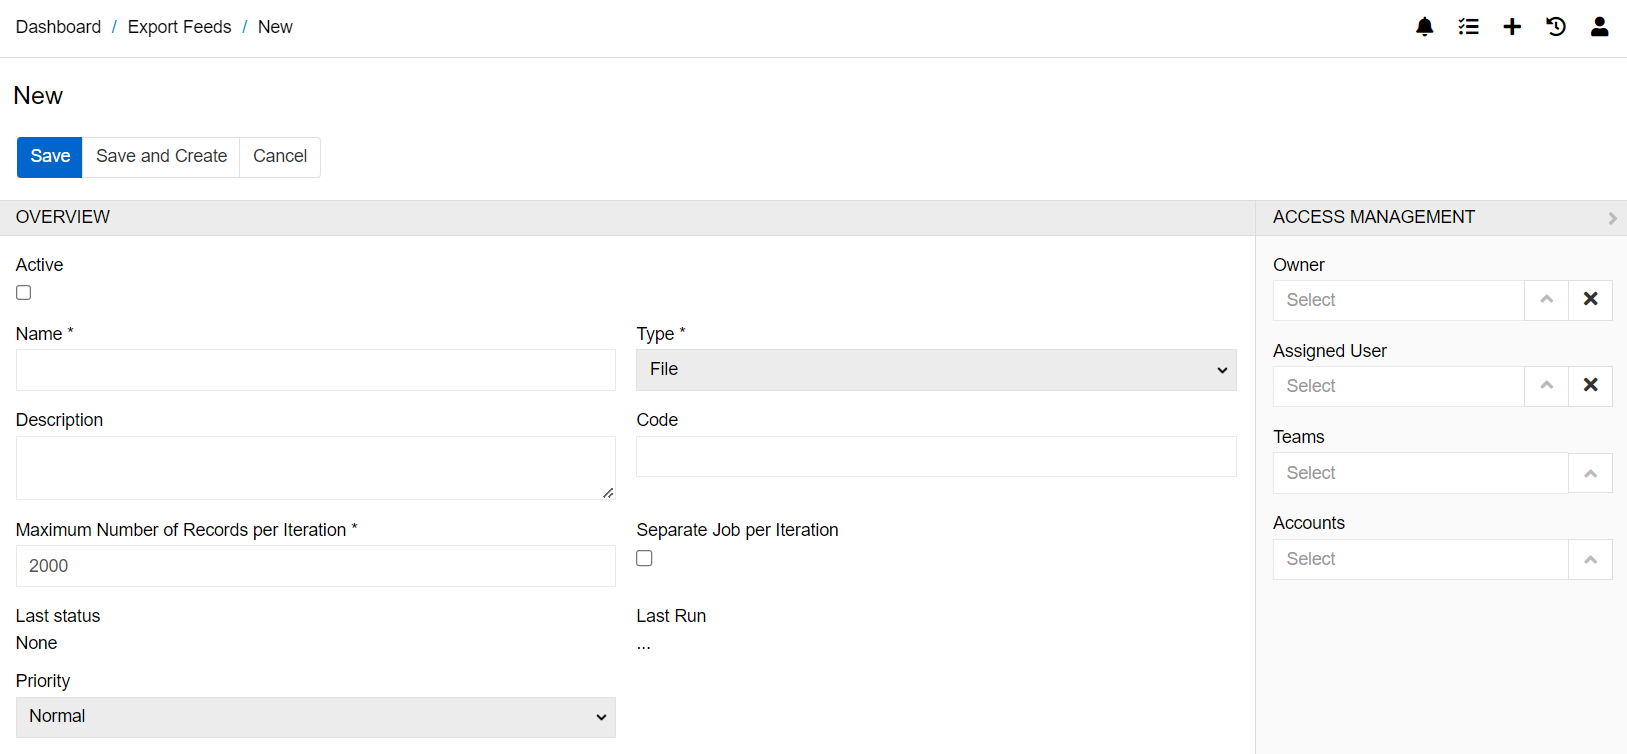
Here enter the export feed name, select its type and define its owner. By default, the export feed type is File. In case you need to export the data to the other sources, the corresponding modules installation is required.
To configure the export feed, click on Edit button:
In-line editing is supported here. So prior to making any changes, you have to click the pencil icon located on the right of each editable field.
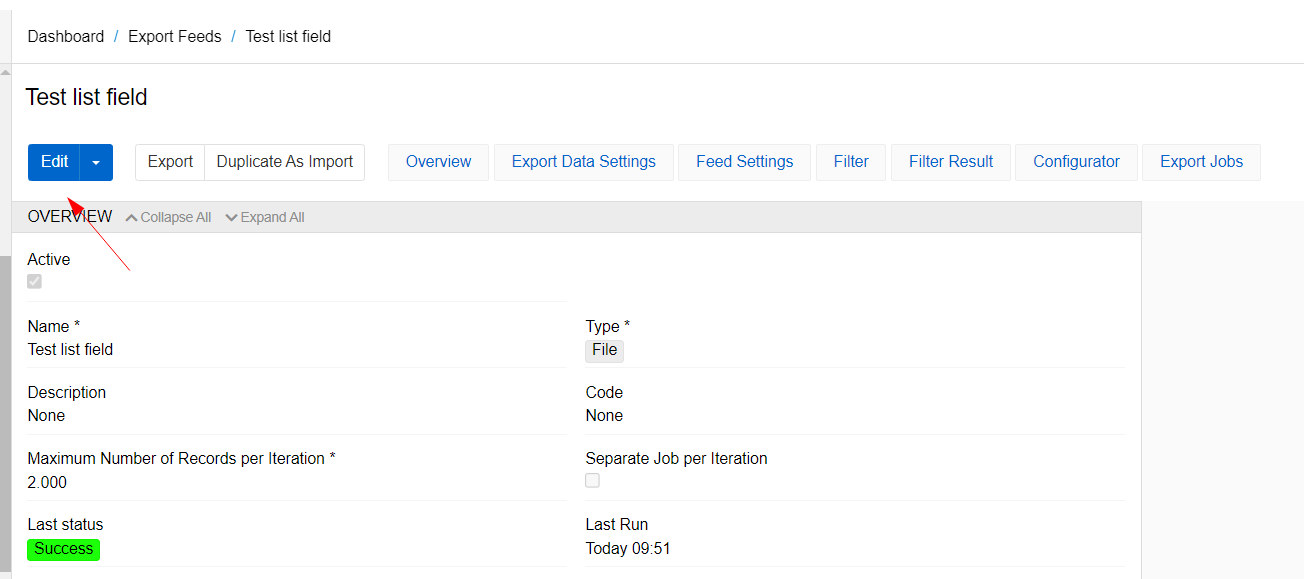
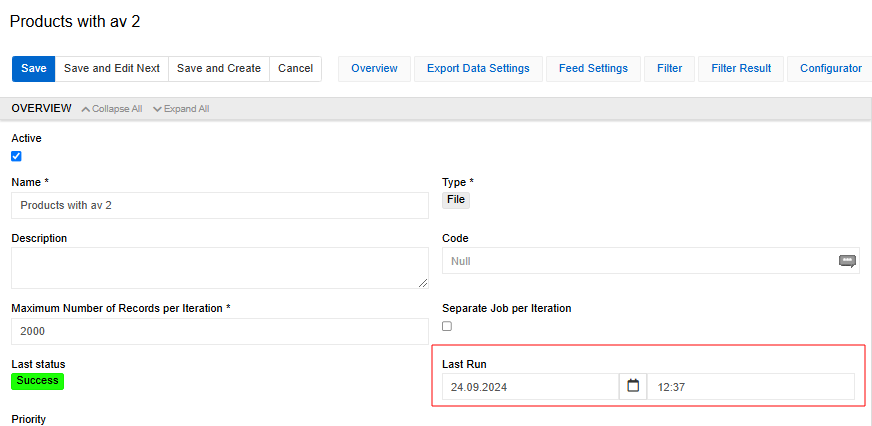
Overview panel
Overview panel enables you to define the main feed parameters (name, action, activity etc):
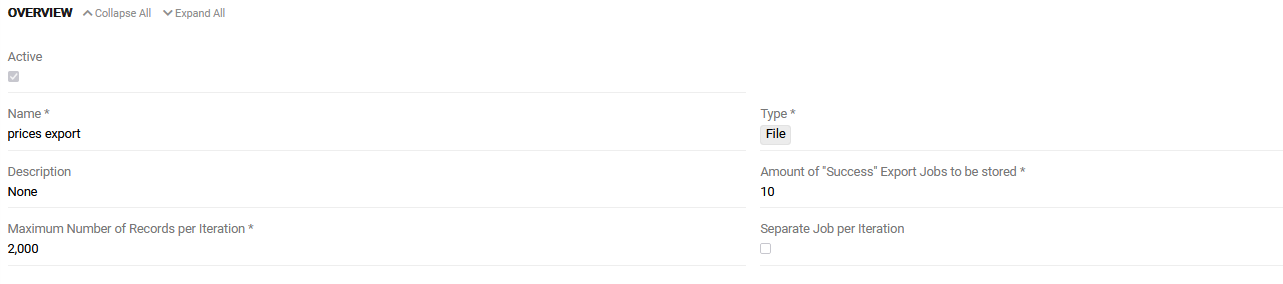
The following settings are available here:
- Active – select this checkbox to activate the export feed. If the export feed is not activated, the exporting feature will be disabled for it.
- Name – export feed name.
- Description – enter the description of the export feed usage, i.e. what data and in what form they are exported, as a reminder for the future. This field is not required.
- Type – the export feed type defined on its creation only; it cannot be modified.
- Maximum Number of Records per Iteration - here enter the maximum number of rows to be exported at a time.
- Separate Job per Iteration - check if each iteration should be performed in a separate export job.
You may also set up your export feed in the Export Data Settings panel and in the Feed Settings panel.
Export Data Settings

- Format – from the drop-down list select the file type in which the data export will be performed. The available formats are CSV, Excel, JSON, XML and SQL.
- Header row – leave the checkbox activated to include the column names in the export file or remove its selection to skip column names from exporting.
When the CSV file format is selected, the following settings are added to be configured via the drop-down lists:
- Field delimiter – select the preferred field delimiter to be used in the export file:
;,,,\t,|. - Text qualifier – select the preferred separator of the values within a cell: single or double quotes.
- Use quotes for all values - select the checkbox if you want all exported values to be enclosed in quotation marks. Otherwise, only text values that contain more than one word will be enclosed in quotes.
When the XML file format is selected, the following settings are added to be configured via the drop-down lists:
- Template – select the information you want to export by using Twig syntax.
- File Name Mask – Select the preferred template for the filename, using the same logic as for the `Template' field.
If in the xml schema Location is provided, the XML, which is generated by an Export Feed is automatically validated against provided XSD file.
Please, note that by default the XLSX (Excel) file format is set and the Header row checkbox is activated.
In the Feed Settings panel you may set up the following values:
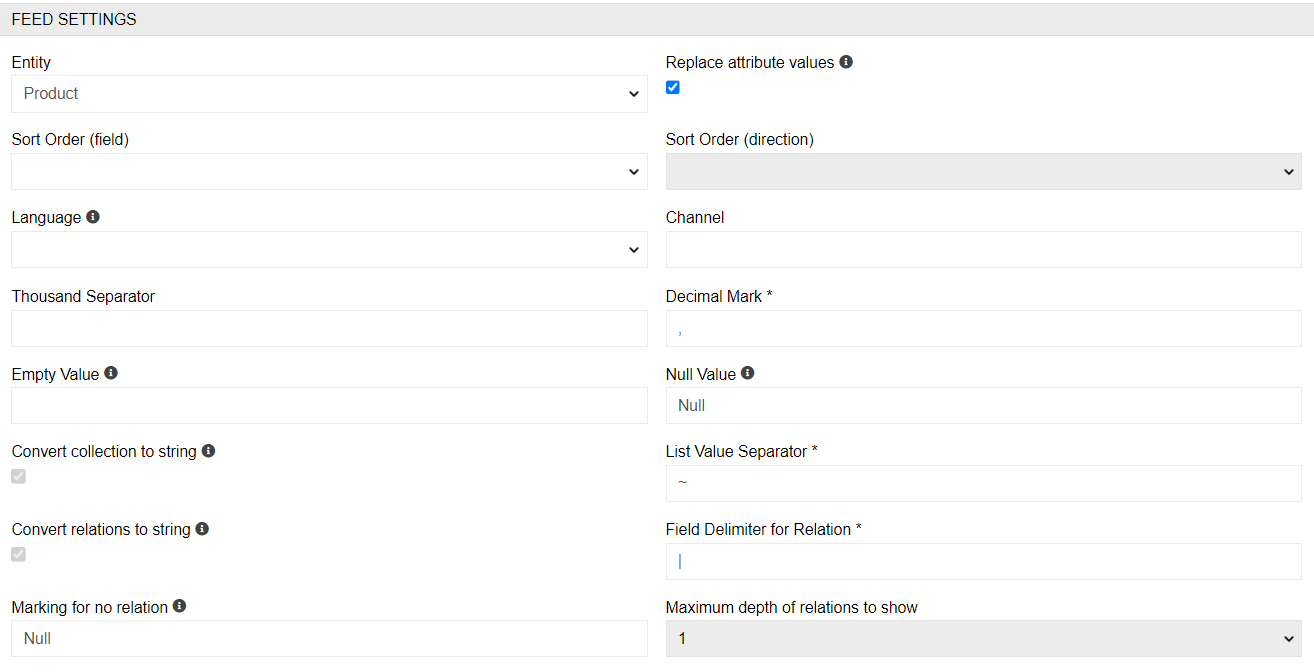
- Entity – from the drop-down list of entities available in the system select the desired entity type, for which this export feed will be used.
- Replace attribute values - replace non-existing channel specific attribute values with global values.
- Sort Order (field) - allows you to select the column by which the data in the file will be sorted.
- Sort Order (direction) - defines the sorting order (you can use the ASC (smallest value first) or and DESC (largest value first) order.)
- Language - this value is inherited by creating a rule for some language specific attribute and has no impact on export itself. Choosing the language helps to receive the localized data.
- Fallback Language - is available when field Language is not empty. If the value in the language set as prism is not specified, the value in the fallback language is exported instead. If the Fallback language is not set, no replacement is performed and the empty value is exported with the corresponding mark specified in the feed settings. If some language is selected for a prism, it cannot be selected as fallback language.
- Thousand separator – define the symbol, which is used as thousand separator. This parameter is optional. The numerical values without thousand separator will be also imported (eg both values 1234,34 and 1.234,34 will be imported, if "." is defined as a thousand separator).
- Decimal mark – select the used decimal mark, usually
.or,should be defined here. - Empty Value – This symbol will be interpreted as "empty" value additionally to the empty cell, eg "" and "none" will be interpreted as "", if you define "none" as an empty value.
- Null value – this value will be interpreted as "NULL" value.
- Convert collection to string - check if the fields and attributes of type: multi-enum, array, one-to-many relation should be converted to string.
- List Value Separator - specify the mark for dividing the values of the list.
- Convert relations to string - check if the relations of the exported entity should be converted to string.
- Field Delimiter for Relation - specify the mark for separating the relations.
- Marking for no relation - specify how a not linked relation should be labeled.
- Maximum depth of relations to show - determines the maximum depth of the relationship to display when selecting a related entity field.
Click the Save button to complete the operation; the new record will be added to the export feeds list. You can configure it right away on the detail view page that opens or return to it later.
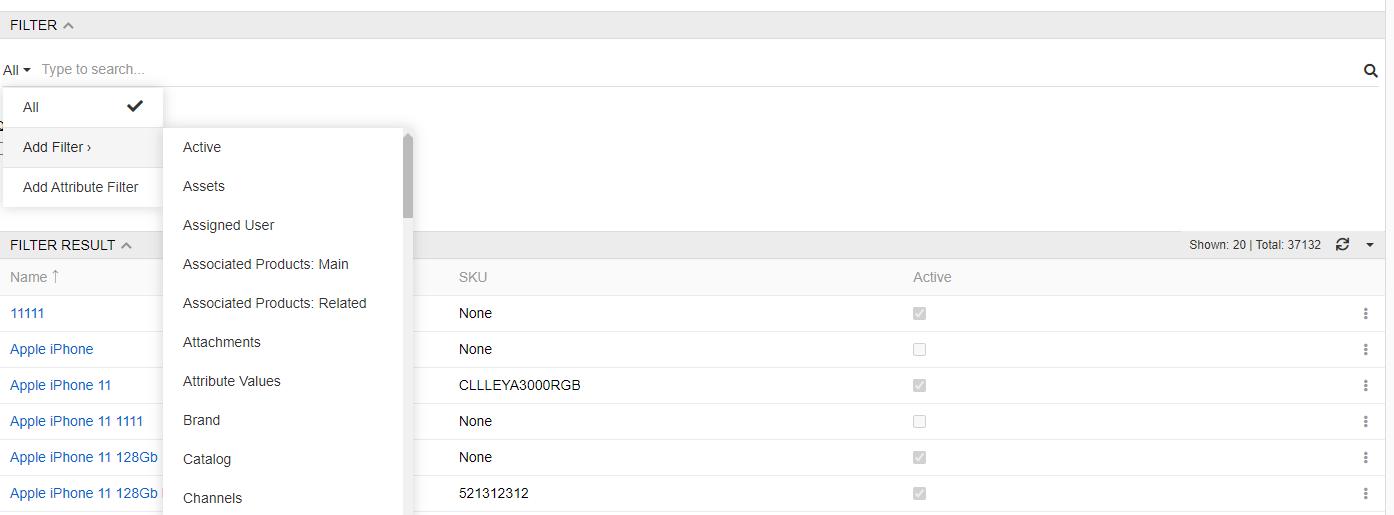
Filter
Filtering settings for export feeds are the same as for product list view. In the Filter panel, you can filter the records you want to export. To set a filter, click the Edit button in the top menu of the Export feed. In the Filter result panel, you can see all the filtered records.
Export only modified records
If you regularly export data with the same feed, you may need to export only those records that have been changed since the last launch of feed. For this purpose, you can use boolean filter “Unexported”.
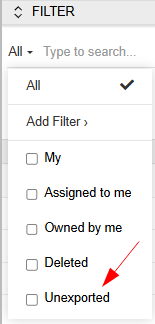
It will filter out only those records that have a Modified at date greater than or equal to the date of the last feed run. At the same time, you can change the value of field Last Run manually in case you made a mistake and want to run the feed with the same records again.
Please note that value of the
Modified atfield is affected by changes to fields and attributes (for the Product entity) by default. In the entity settings in fieldRelations effecting modification date/time, you can also add relationships that affect the modification date change.
Configurator
In the CONFIGURATOR panel, you can select the fields and attributes (for the Product entity) of the entity that you want to export. You can add each field individually by clicking the Create "+" button or add all fields with option "Add all missing fields". For the Product entity there is an option "Select attribute(s)" which allows you to select several attributes at once.
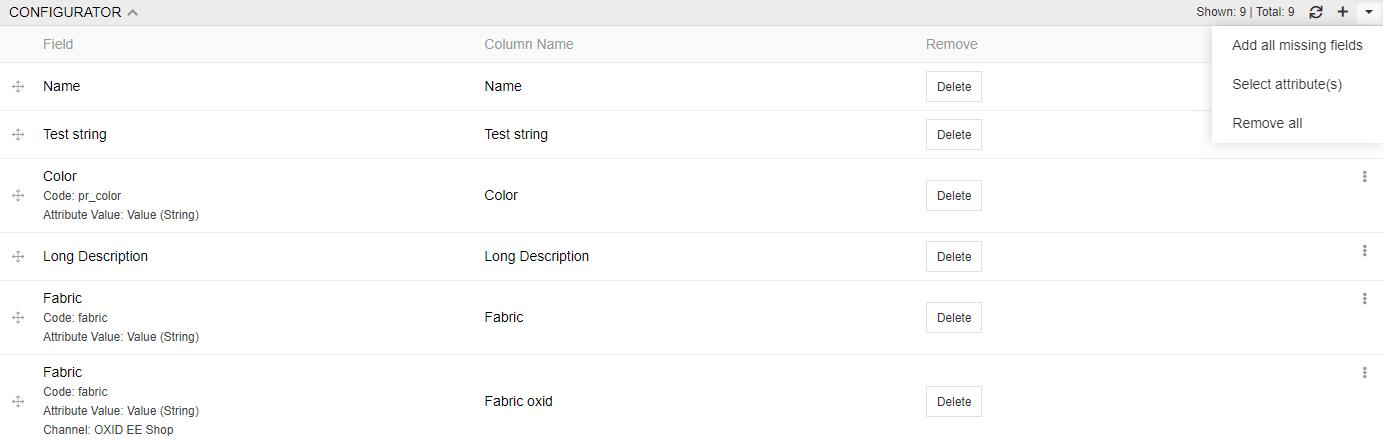
Changing the field order to be displayed in the export file is also done here via drag-and-drop:

Use the Delete button to remove the desired field from the export file.
To add new entity field for export, select the Create option, the following pop-up will appear:
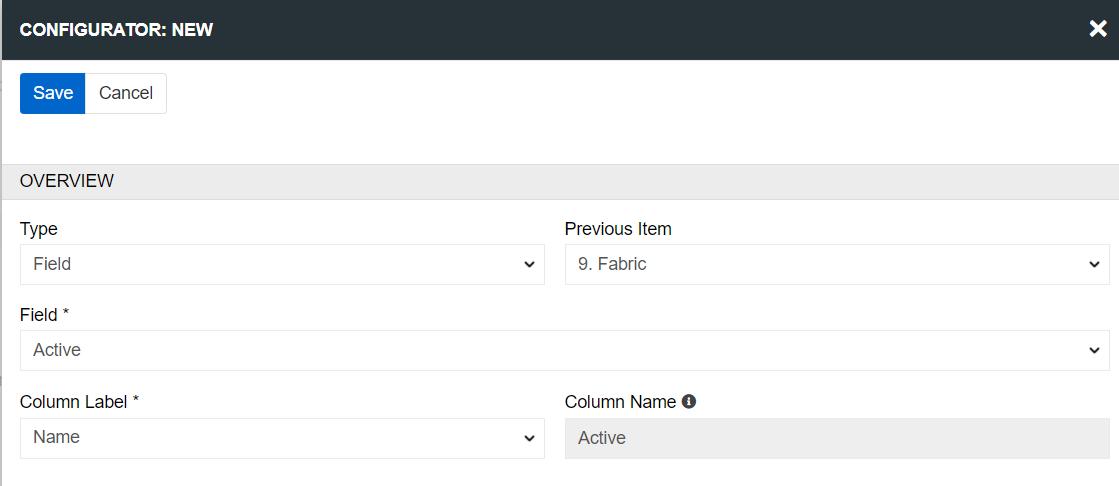
In the Type field, you can select the type of asset to be exported. The following types are available:
- Field - available for any entity
- Attribute - available only for the Product entity
- Fixed value - allows you to export any constant value to a file
- Script - allows you to export any field with any modifications from any entity
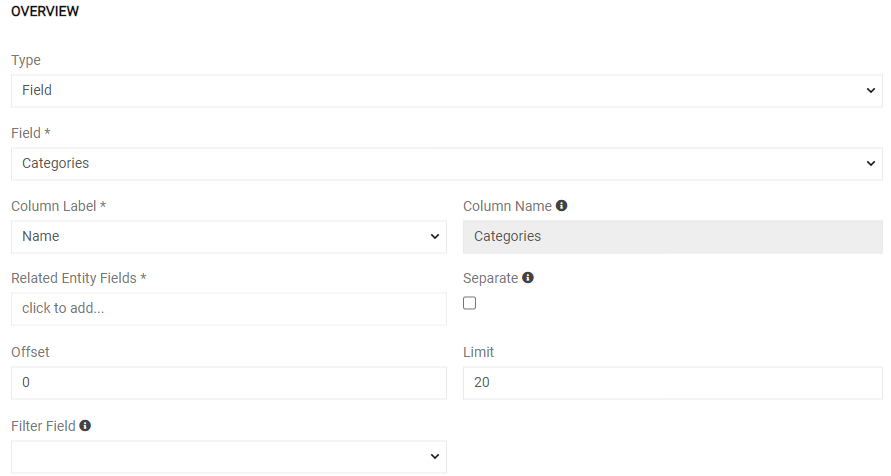
Here select the field from the drop-down list of all fields available in the system for the given entity, modify the Column value, if needed, and define whether data export should be made by ID, name, code or any other related entity field (for those fields, where this option is available).
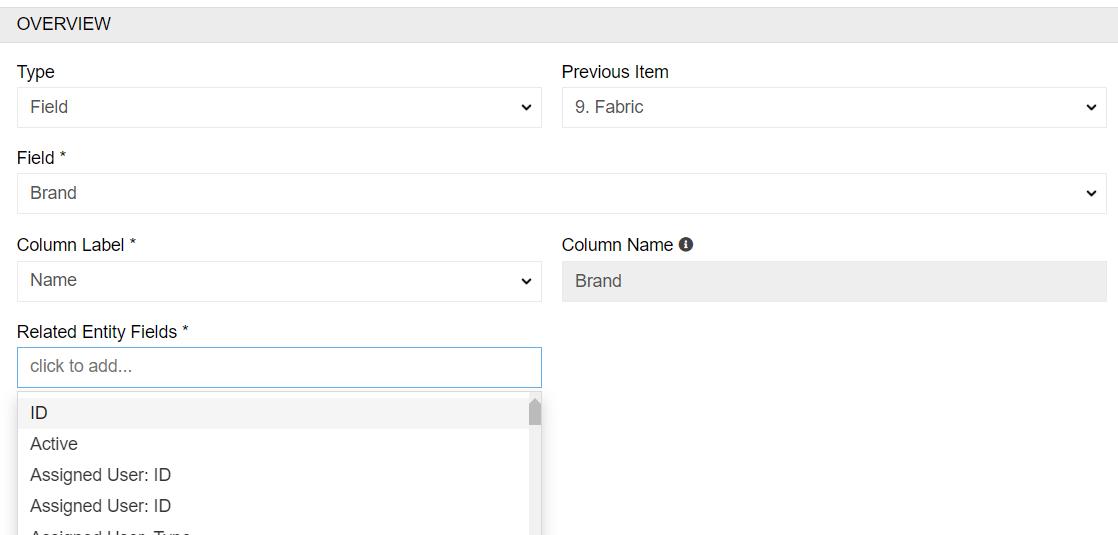
If the field you export has more than one value you can select how many of them you will export by using Limit and Offset values. Offset shows from what serial number to start counting (note that the first value has a serial number of 0). Limit shows how many values to export. For example, Offset 5 Limit 1 will export only one (6th) value.
When used by default these values will select all applicable results.
Attribute export
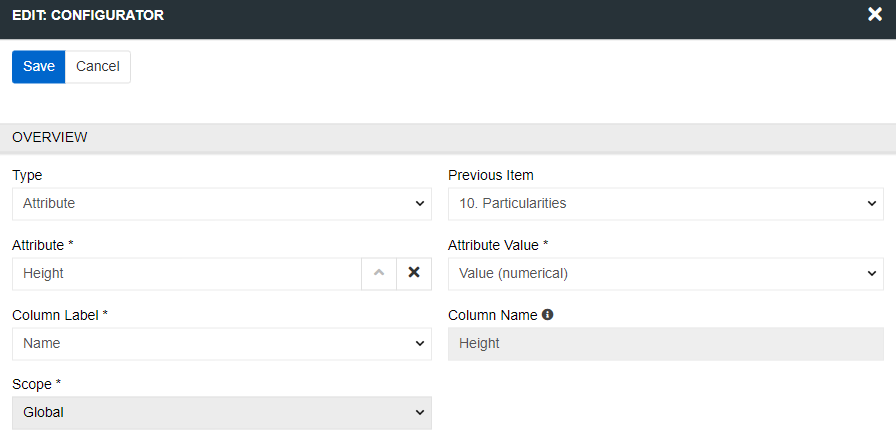
Exporting attributes is available for the Product entity. To export an attribute, select Attribute in the field Typeof CONFIGURATOR or use option Select attribute(s) to select several attributes at once.
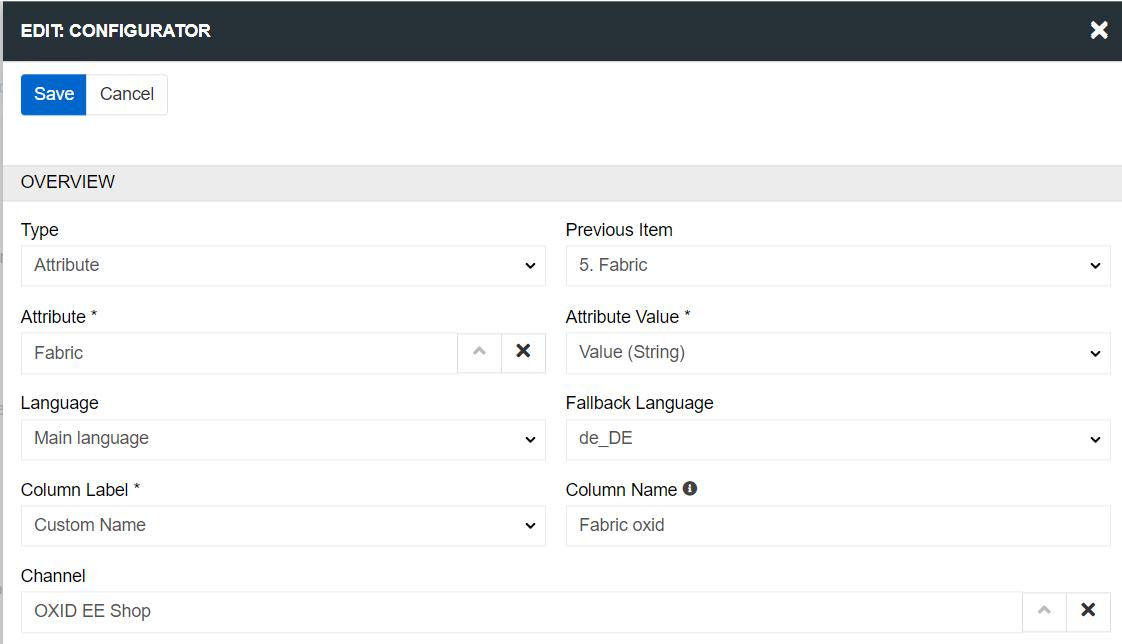
In the creation pop-up that appears select the attribute from the list of the existing attributes and define its channel in the Channel field. The Column field is filled in automatically depending on the selected options. Alternatively, you can enter a different Column name via the keyboard. For multilingual attributes, the CONFIGURATOR also contains the Language and Fallback language fields.
Both entity field and product attribute records added to the export feed can be edited via the corresponding option of the single record action menu:

Click the Remove button to delete the corresponding added entity field or product attribute record.
Units in configurator
If you want to export values (fields or attributes) that have units in them you can do it in several different ways:
- Value Unit / Werteihheit / Значення міри - will export only the unit (name/code/ets - needs to be selected) value of the field or attribute in this column.
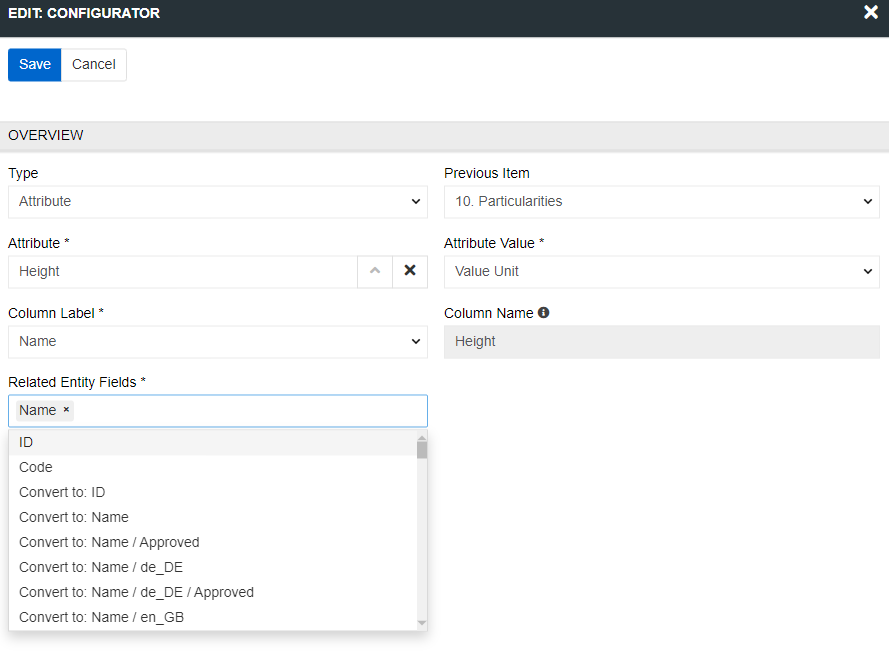
- Value (numerical) / Wert (numerisch) / Значення (чисельне) - will export only numeric (int/float) value of the field or attribute in this column.
- Value / Wert / Значення -- full value (numerical+Unit) - will export both numeric (int/float) and unit (name) values of the field or attribute in this column.
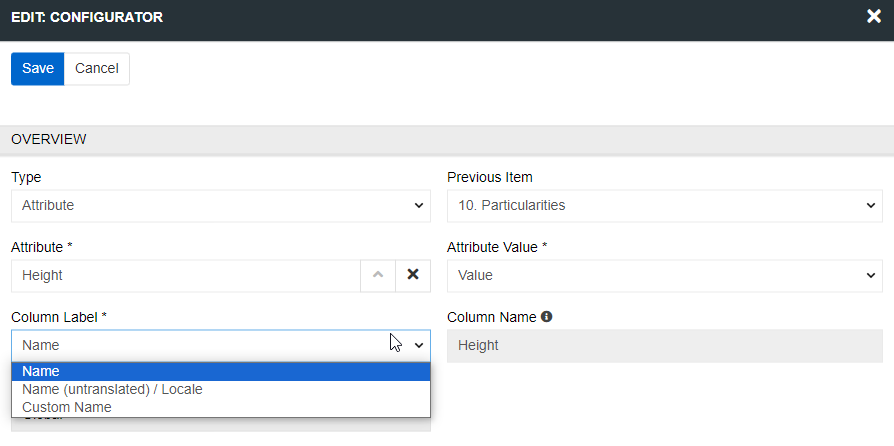
If you wish, you can also export IDs, codes or any other values associated with the attributes.
Script type in configurator
If you want to export values in a specific way and cannot achieve this with standard methods, you will need a script item in the configurator. It significantly expands the standard export capabilities and will allow you to get modified data from any entity. This type is available when the Synchronization module is installed.
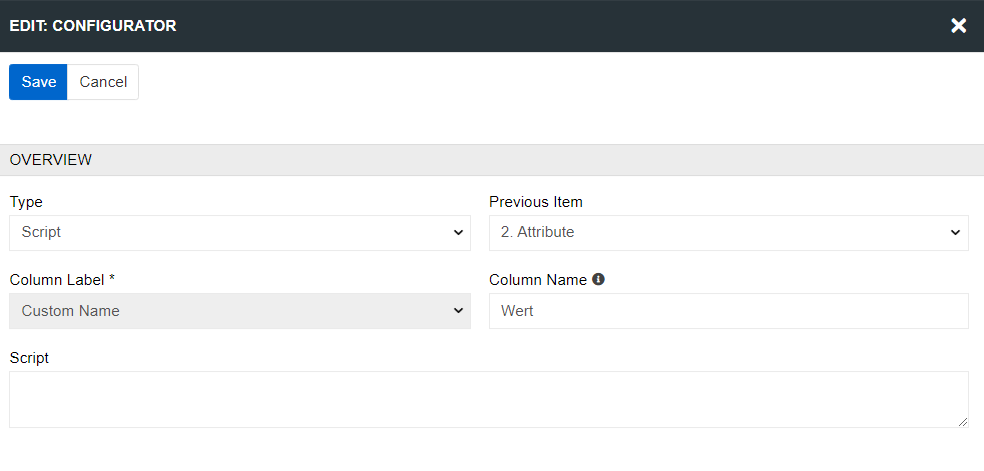
Scrips are based on twig code (for more detailed information regarding twig syntax please go to https://twig.symfony.com/).
Write a script in corresponding field and save configurator item. Below you can see an example of a script that exports in one column Value From for attributes of Range types and Code of List Options for attributes of type List.
{% if record.attributeType == 'rangeInt' or record.attributeType == 'rangeFloat' %} {{ record.valueFrom }} {% elseif record.attributeType == 'extensibleEnum' %} {{ record.valueOptionData.code }}Export Feed Operations and Actions
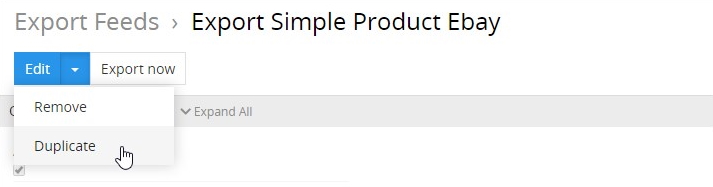
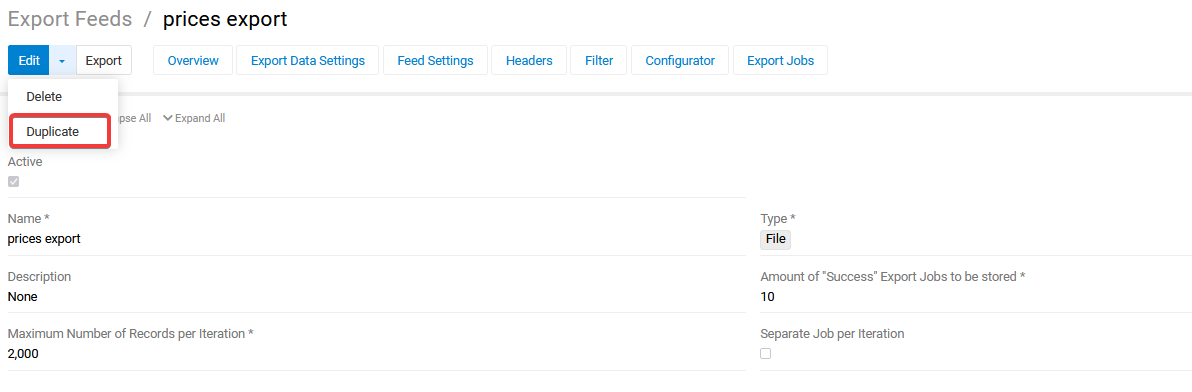
Export feed records can be duplicated and removed whenever needed.
To duplicate the existing export feed record, use the corresponding option from the actions menu on the desired export feed record detail view page:
You will be redirected to the export feed creation page and get all the values of the last chosen export feed record copied in the empty fields of the new feed record to be created.
In order to remove the export feed record, use the corresponding option from the actions menu on the desired export feed record detail view page or from the single record actions menu on the export feeds list view page:
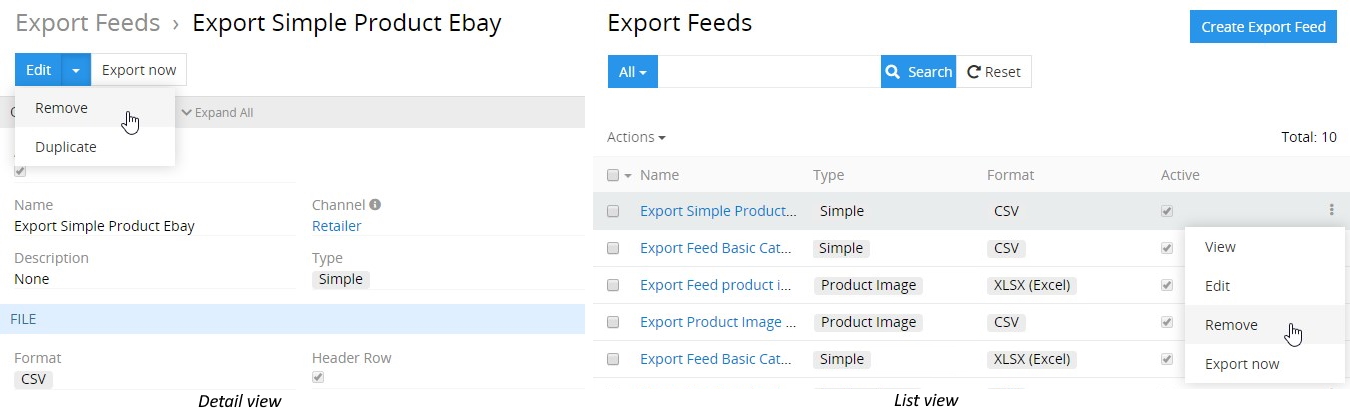
To complete the operation, click the Remove button in the confirmation message that appears.
The "Export Feeds" module also supports common AtroCore mass actions that can be applied to several selected export feed records, i.e. records with set checkboxes. These actions can be found in the corresponding menu on the export feeds list view page:
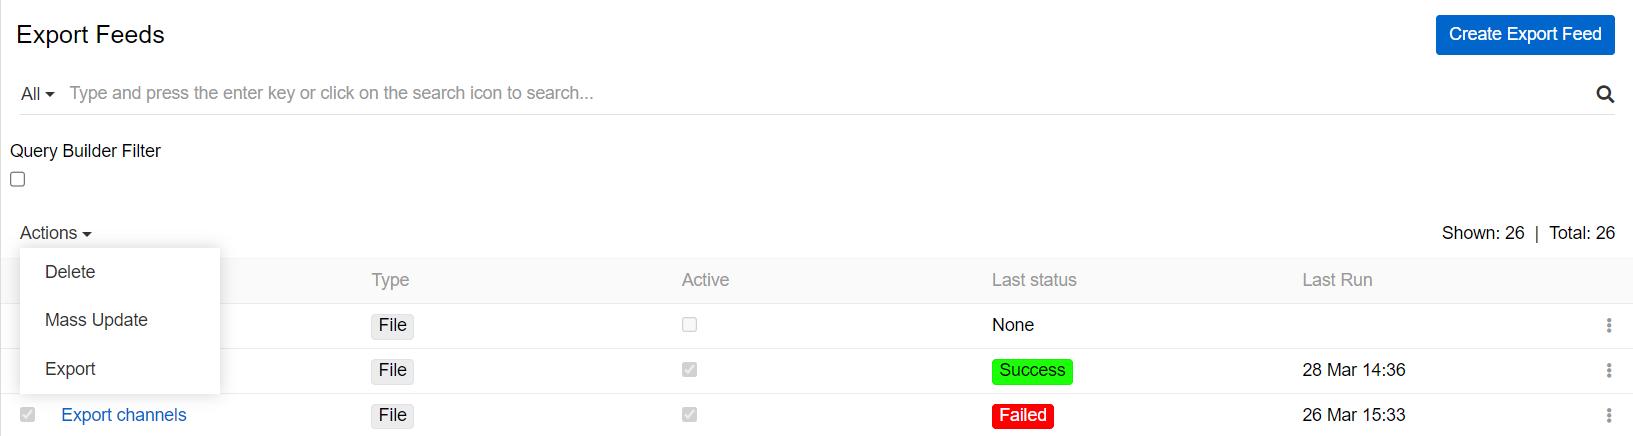
- Delete – to remove the selected export feed records (multiple deletion).
- Mass update – to update several selected export feed records at once. To have a longer list of fields available for mass updating, please, contact your administrator.
- Export – to export the desired data fields of the selected export feed records in the XLSX or CSV format.
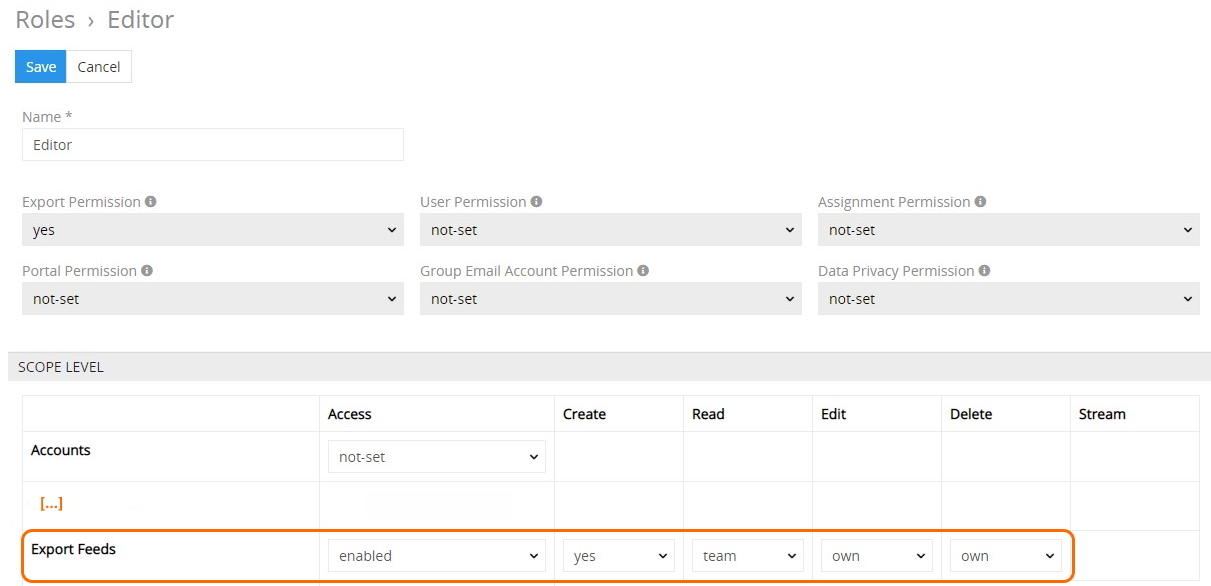
Access Rights
To enable export feed creation, editing, usage and deletion by other users, configure the corresponding access rights to the Export feeds entity for the desired user / team / portal user role on the Administration > Roles > 'Role name' page:
User Functions
After the "Export Feeds" module is installed and configured by the administrator, user can work with export feeds in accordance with his role rights that are predefined by the administrator.
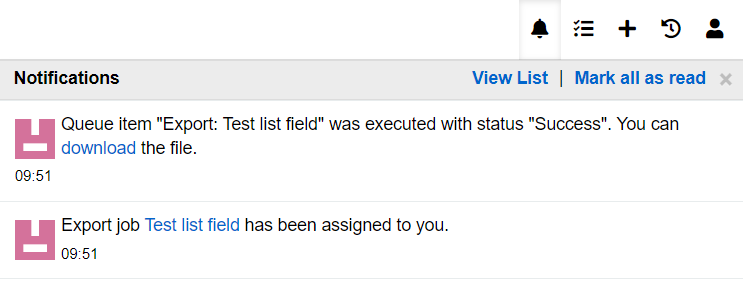
When export is started, its details and current status are displayed in the Job Manager pop-up that appears automatically:

You can cancel the export from the Job Manager by clicking the Cancel button. After successful export, a notification will appear in the Notifications panel. You can download the exported file directly from it:
If any errors arrive during export they will also be shown in the Job Manager.
You can also see last time export feed was executed and status of the last job executed in export page.
Asset Export to a ZIP archive
When exporting from Assets, Product, Brand or other entities that contain the Asset field, you can export files to a ZIP archive. In this case, the archive will consist of the exported file in chosen format and one or more (depending on the number of fields with assets) folders with exported documents. The folder will have the name of the field from which files are exported.
In order to export assets to an archive, you need to check the checkbox "Export assets to a ZIP archive" in Export feed configurator. The checkbox appears only if selected field contains assets.
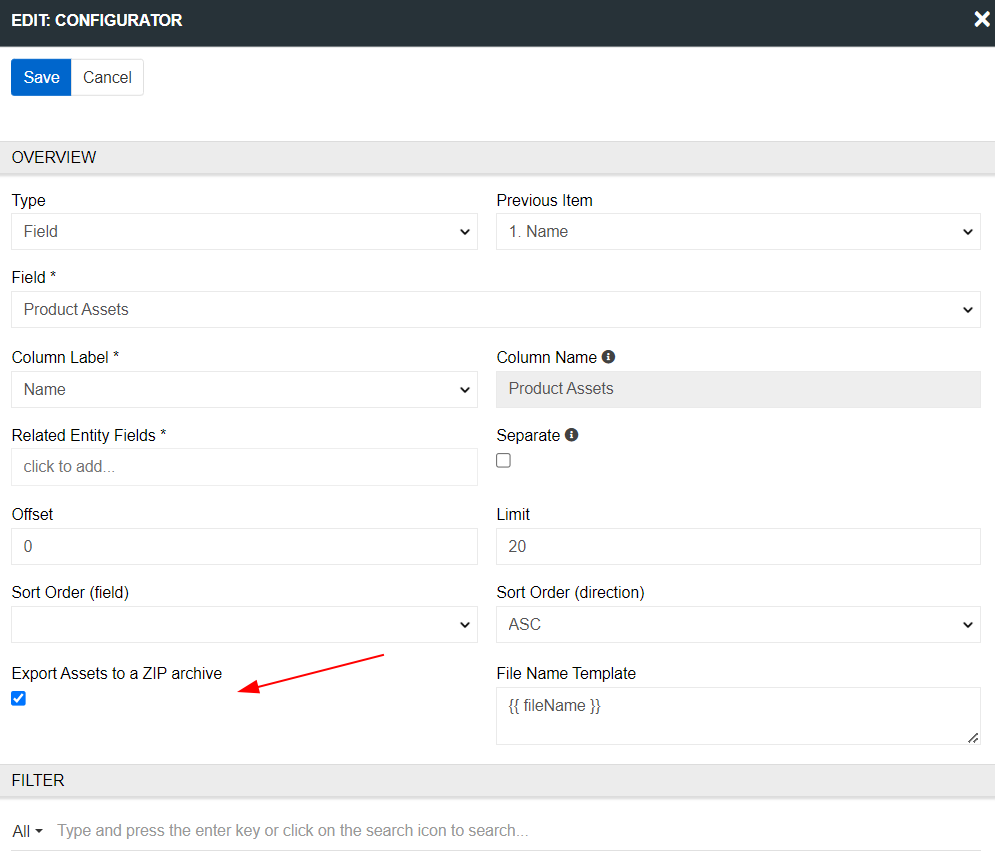
The names of the files in the archive correspond to the names of the assets by default. You can change naming using the "File Name Template" field.
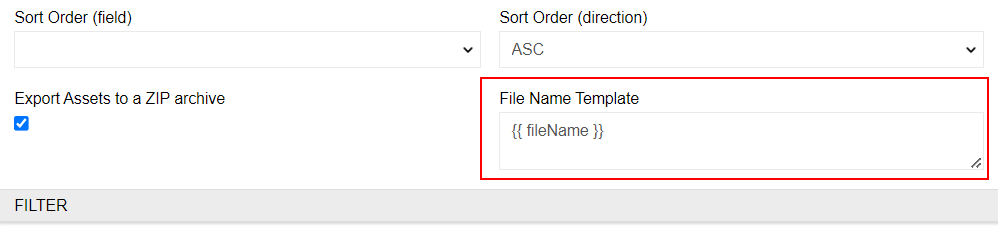
To set file names you can use the following variables:
- {{currentNumber}} - serial number of the asset in the export entity
- {{fileName}} - the actual name of the file
- {{entity}}- entity object that is exported
By default, the variable {{fileName}} is specified in the "File Name Template" field. This means that if you don't change anything in it, the file will have the original asset name. If you want to add a sequence number to the file name, the template will look like this:
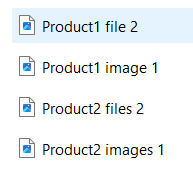
{{fileName}}_{{currentNumber}}You can also add to the file name the name of object (Product, Brand, etc.) from which the asset is exported. To do this, use the following template:
{{entity}} {{fileName}} {{currentNumber}}Then when exporting from two products that have two assets each, the naming will be as follows:
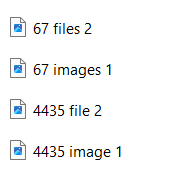
To add the attribute value to the file name, you can use the findRecord function. As parameters, you need to pass the name of the entity (ProductAttributeValue) and the identifiers of the record (f.e. product Id, attribute Id, channel Id, language). For example:
{% set productId = entity.id %} {% set pav = findRecord('ProductAttributeValue', {'productId' : productId, 'attributeId' : 'h64e5a3eeaf1a728f', 'channelId':'','language':'main'})%} {{pav.value}} {{ fileName }} {{currentNumber}}We have attribute value 67 for Product1 and 4435 for Product2 so the file names will look like this:
Running Export Feed
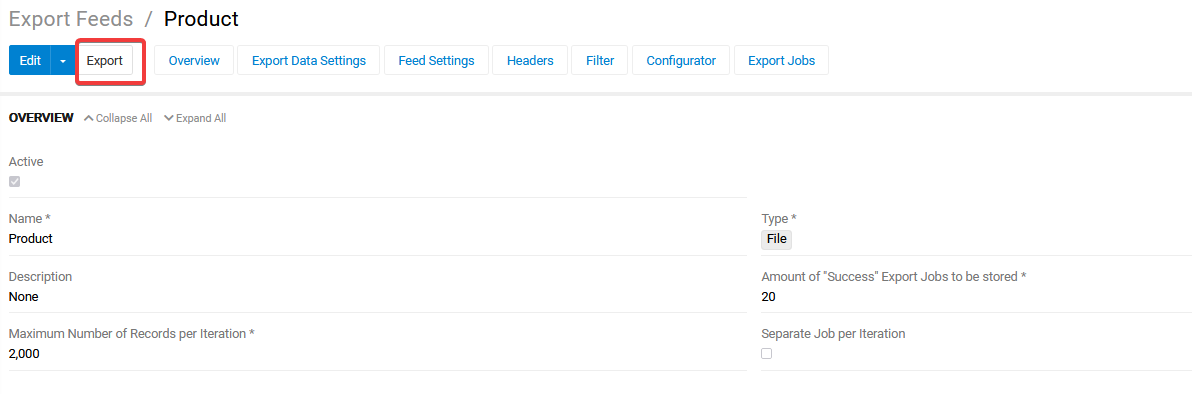
Click on Export button to export the data from your system.
Started export job is added to the Job Manager, where you can see the current status:

The new record is also added to the "Export Jobs" Panel with the state Pending. After the export job is successfully completed the state will be automatically changed to Done.
While the export is running you may cancel it in the right-side menu:

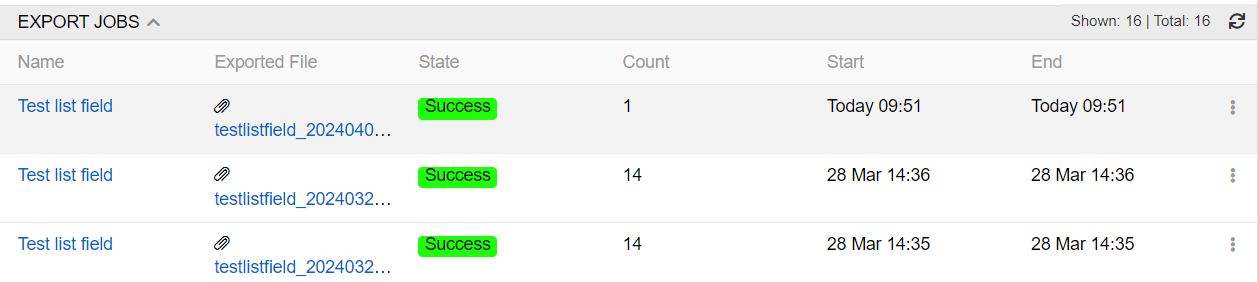
Export Jobs
Information about completed export jobs is displayed on the Export Jobs panel, which is empty on the export feed creation step but gets filled in after the data export is performed via the given export feed.
Results of the data export can be viewed in two ways:
- on the "Export Jobs" panel of the respective export feed, which shows the details on the export operations performed via the currently open export feed:

- on the "Export Jobs List Page", which shows details on all export jobs performed in the system via export feeds. To open this page, click on the
Export Resultsin your main navigation.

The Export Jobs details contain the following information:
- Name – the Export Job record name, which is generated automatically based on the date and time of the export job start. Click the Export Job record name to open its detail view page.
- Export feed – the name of the export feed used for the export job. Click on the export feed record name to open its detail page.
- Exported file – the name of the data file (CSV) where the exported data is stored. Click the exported file name to download it.
- State – the current status of the export operation.
- Start – the date and time of the export job start.
- End – the date and time of the export job end.
- Created – the number of records created as a result of the performed export job. Click on this value to open the list view page of the corresponding entity records filtered by the given Export Job, i.e. with the
Created by exportfilter applied. - Updated – the number of records updated as a result of the performed export job. Click on this value for the desired Export Job to open the list view page of the corresponding entity records filtered by the given Export Job, i.e. with the
Updated by exportfilter applied. - Errors – the number of errors, if any, that occurred during the export job. Click on this value for the desired Export Job to open the list view page of the Export Job log records, where you can see the details on all errors.
The following States are available:
- Running – for the currently running export job.
- Pending – for the export job, which is next in line for execution.
- Success – for the successfully finished export job, regardless of containing errors.
- Failed – for the export job that could not be performed due to some technical issues.
- Canceled – for the export job that has been stopped by the user.
Exported File
Exported file can be downloaded, eg to check what exactly was exported, if you click on the file name in your Export Jobs record.
Export Feed Actions
To duplicate the existing export feed record, use the corresponding option from the actions menu on the detail view page of the desired export feed record:
You will be redirected to the export feed creation page and get all the values of the last chosen export feed record copied in the empty fields of the new feed record to be created. After save the mapping rules from the configurator will be copied too.
You can also duplicate an export feed as an import feed by clicking the Duplicate as Import button. You will be redirected to the import feed creation page and get all the values of the last chosen export feed record copied in the empty fields of the new feed record to be created. After save the mapping rules from the configurator will be copied too.
To delete the export feed record, use the corresponding option from the action’s menu of your export feed.
To copy configuration of the export feed as JSON, use option Copy Configurations
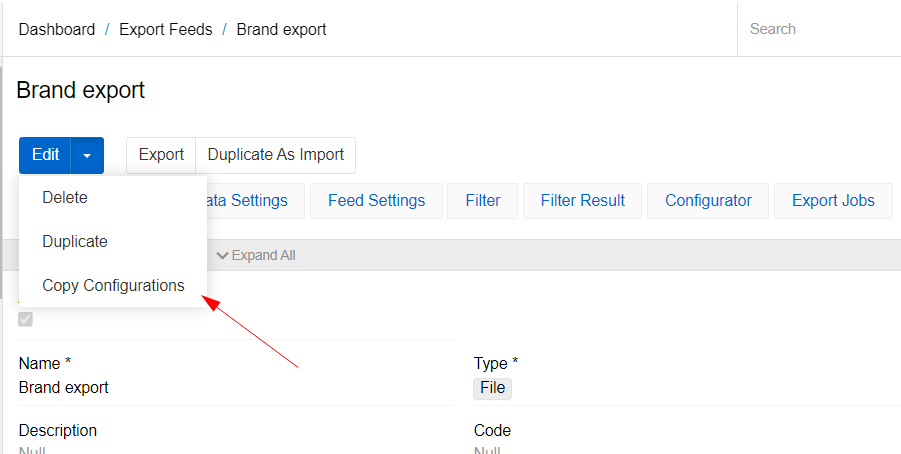
This option is available for all types of export. Thus, you can create a feed via API with the same configuration using the Upsert command.
Exporting from entity
You can export directly selected data directly from different entities. To do so, go to entity, from which you want to export and select data you want to export. In an example below you can see exporting selected products. To export them, after selecting, press Actions and select Export.
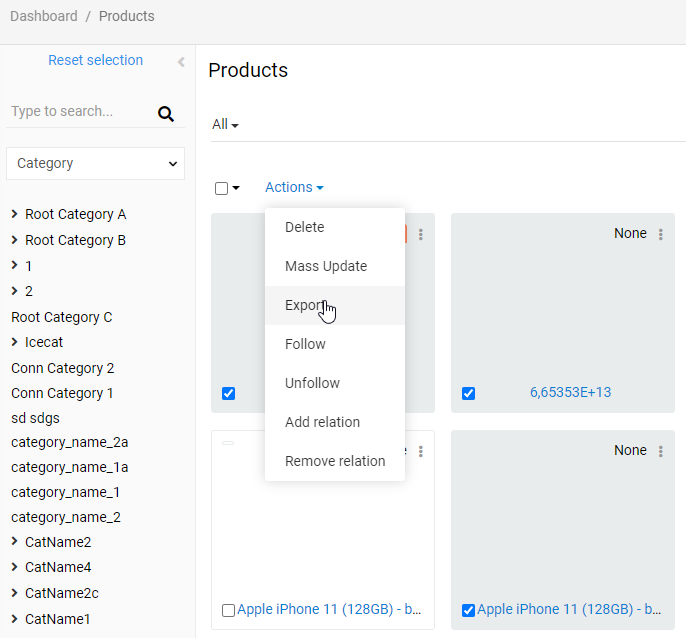
There you will see export menu

Select existing export feed related to this entity and press Export. A new export job will be created. For the purposes of this job all the configuration will be taken from selected export job except filters (only the data you selected will be used).
Exporting to Excel file with multiple sheets
If you have the Synchronization module, you can export data to an Excel file with multiple sheets. To do this, select the appropriate checkbox in the data feed settings.

After selecting this checkbox, you will see the Sheets panel under the Feed settings. To create a new sheet, click on the "+" button. The following pop-up will appear
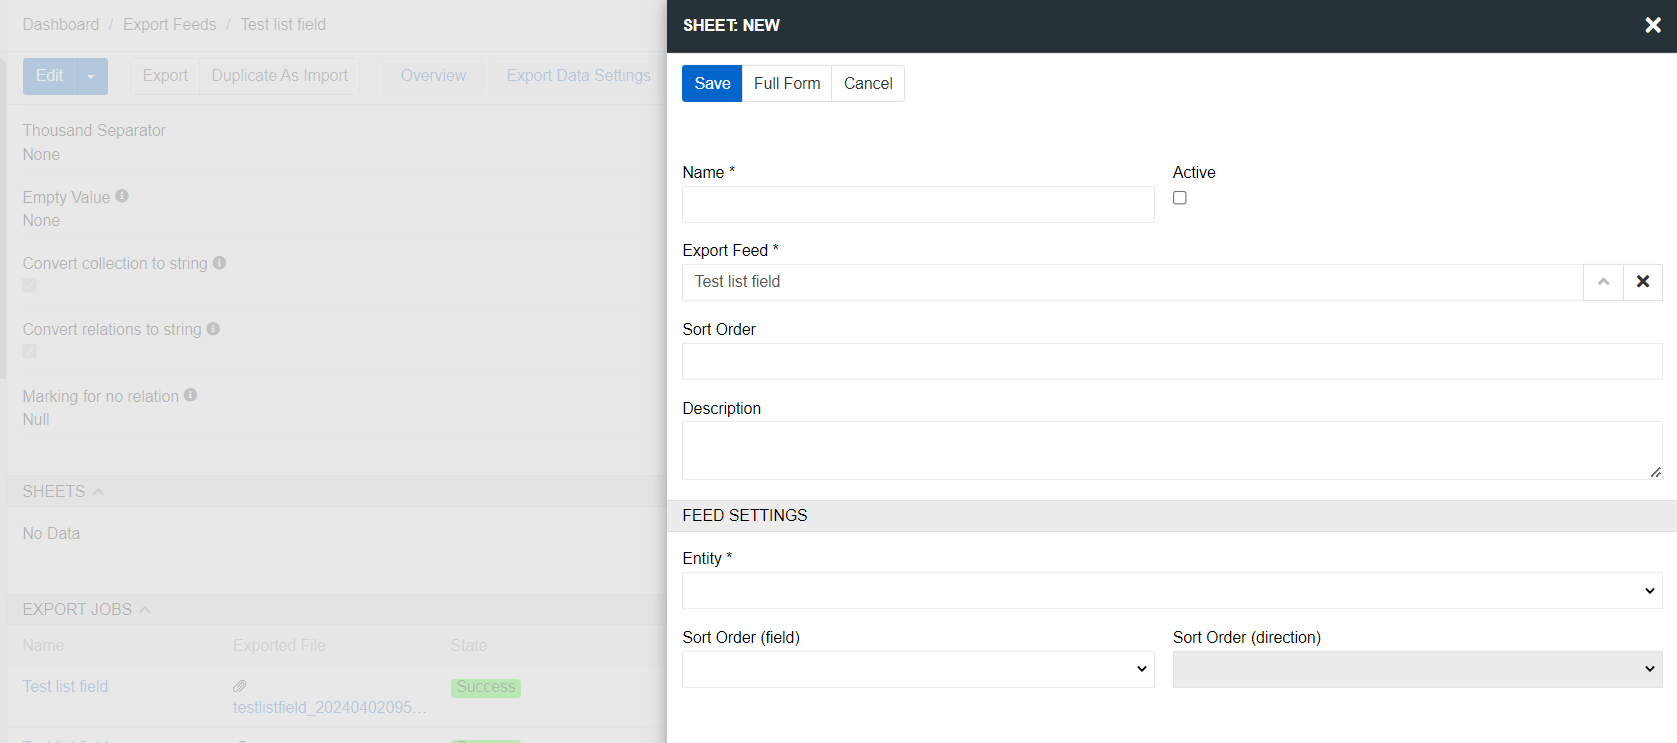
Here you can set the name of the sheet, the export feed to which it belongs, the sort order, and the entity from which the export will be performed. For the sheet to be exported, it must be Active. After you save the sheet, it will appear in the corresponding panel of the export feed.

Click on an sheet to configure it. The sheet page contains the same panels as the export feed: Overview, Feed settings, Filter, Filter results and configurator.
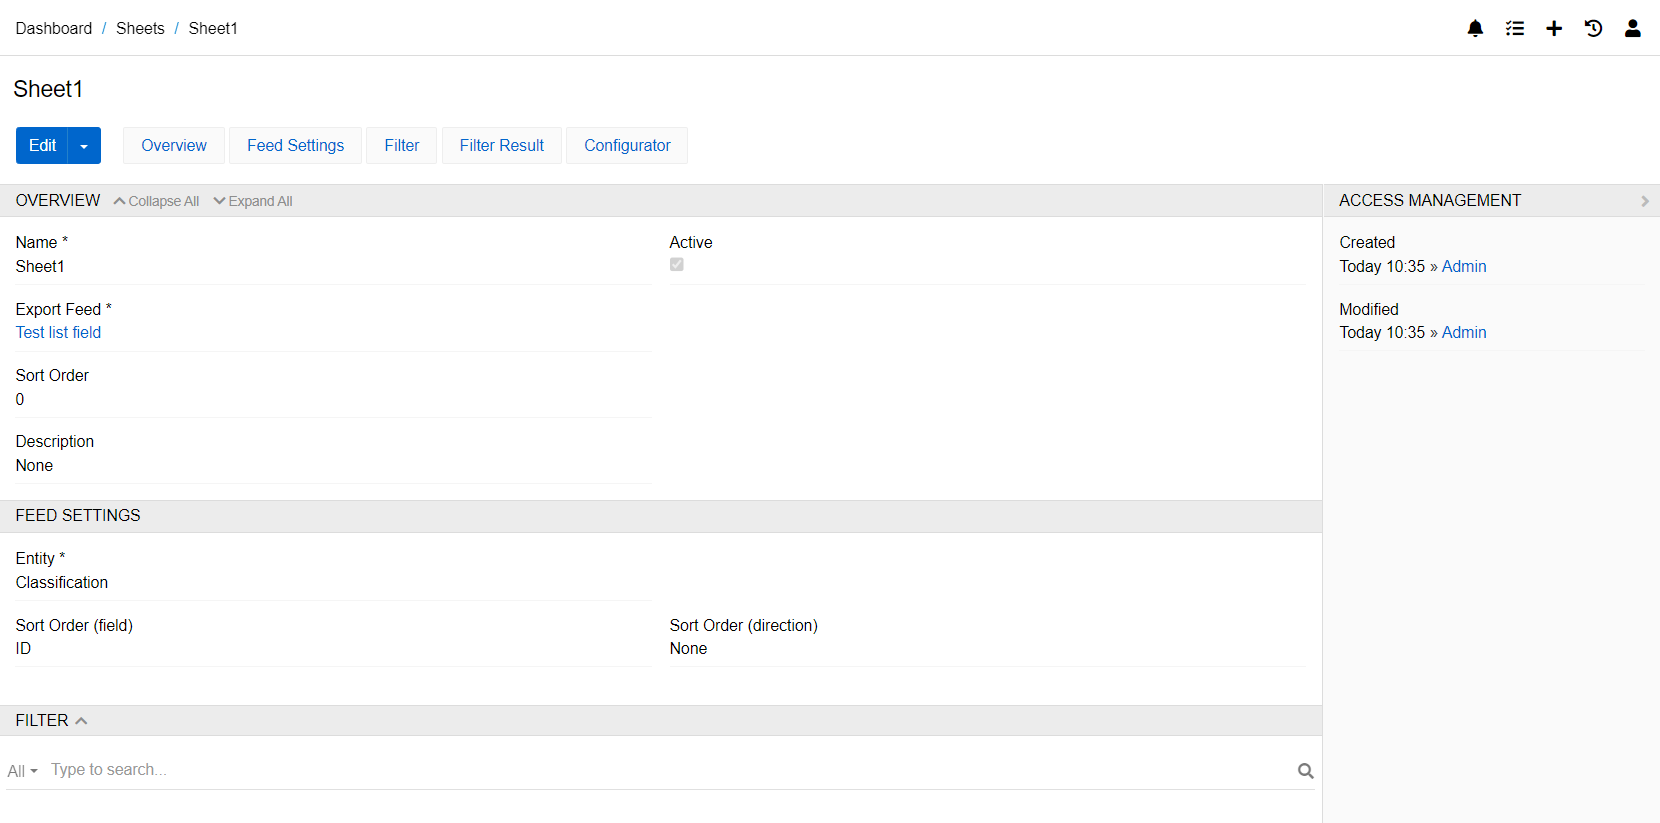
All these settings are set separately for each sheet. An excel export feed can have any number of sheets. All of them are exported with a single button to a single file.
Exporting pictures
If you want to export images, there are three ways to do it:
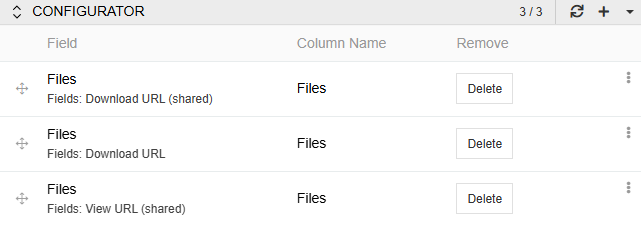
1) Download URL (shared)
This option will create a link that will allow you to download the file.
2) Download URL
This option works in the same way as the previous one, but requires authorization to start the download.
3) View URL (shared)
This option allows you to view the image directly in your browser. No authorization required.