User Interface (UI)
The user interface (UI) includes all visible elements users see and interact with while using AtroCore. This article contains the overview of all the main elements of user interface, which are the same for all entities in the system, as well as gives details on how to perform common tasks or operations in the system.
Please, make sure to contact your administrator in order to have access to a whole set of options described in this user guide.
The following elements make up the AtroCore user interface:
- Navigation Menu – to navigate through available entities.
- Taskbar – to help the user interact with the AtroCore system in a more efficient way; additional information or actions are displayed here.
- Search and Filtering Panel – to search and filter within one of its related entities.
Within the AtroCore system your information may be presented in various ways:
- List View – to view the lists of entity records.
- Detail View – to view the entity record details.
- Create View – to create a new entity record in the main window.
- Edit View – to edit the entity record.
- Quick Detail View (pop-up) – to view the record details in the pop-up window.
- Quick Edit View (pop-up) – to edit the record detail in the pop-up window.
- Quick Create View – to create a new entity record in the pop-up window.
Navigation Menu
You can view the navigation menu by clicking the 'burger menu' icon in the top left corner:
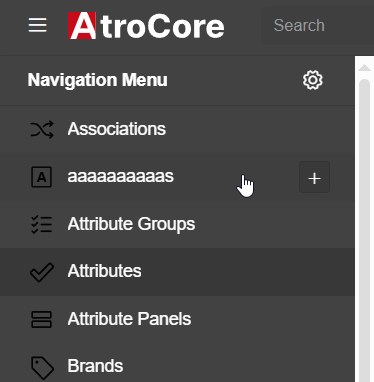
The navigation menu in the default AtroCore theme can be found in Administration / User Interface. It allows you to open list views for all entities in the system.
The navigation menu can be configured by your administrator to suit your needs.
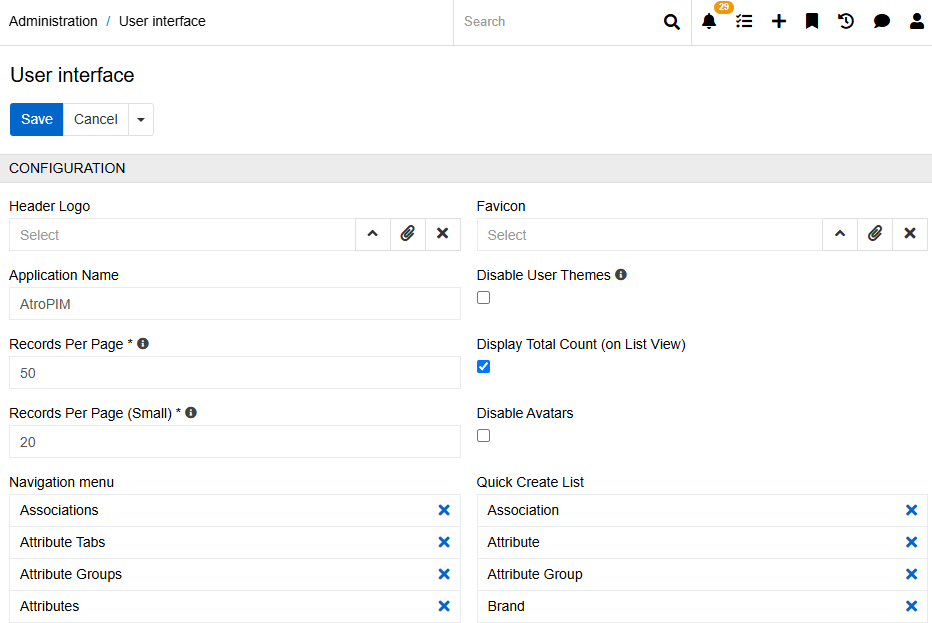
Select the Navigation Menu option and add the desired tabs using the Add button. You can also define the order of the tabs by dragging and dropping them into the tab list.
You can also select options for Quick Create List, Favicon and Header Logo. Other options on this page are described in detail in the following paragraphs.
Taskbar
Taskbar is a top panel of the AtroCore user interface:

A taskbar consists of a search field, Favorite Entities Navigation Bar and some functional icons that help you work and collaborate within the AtroPIM system, namely:
Global Search
You can search all the records existing in the AtroCore system using the global search functionality. Use the search form on the taskbar for it:

The list of entities available for search is configured by the administrator in the
Administration > System > Settings > Global Search Entity List. Please consider, only the fields configured at "Text Filter Fields" for each entity will be searched through.
Wildcards can be used for search, at any place in the search string, separately or in any combination.
| Character | Use |
|---|---|
| % | Matches any number of characters, including zero |
| _ | Matches only one character |
Favorite Entities Navigation Bar

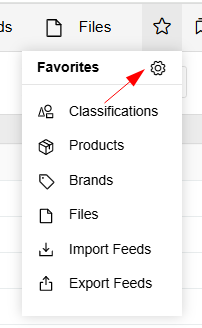
The Favorite Entities Navigation Bar can be used to quickly access the most frequently used entities. By default, it displays Classifications, Products, Files, Import and Export Feeds. You can customize the menu content by adding or removing entities as needed.
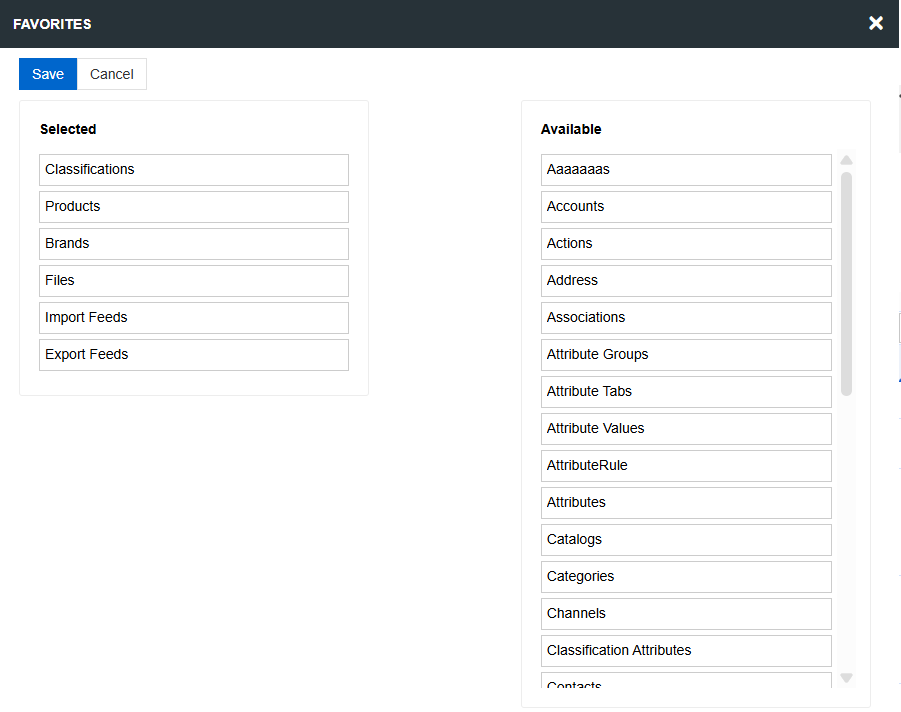
To add an Entity to the menu, click on the star on the right side of the panel. List of Favorite Entities will open. If there are too many Entities to display in the Taskbar Menu, you can also use this drop-down list to quickly access the desired entity. Сlick on the configuration gear to open Favorites Layout.
The modal window for configuring Favorites opens. Drag the entities you want to appear in the Navigation Bar to the left column and click Save. The changes will be applied immediately.
You can also add an Entity to Favorites by clicking on the star icon in the List View of any Entity. Clicking on the icon again will remove the Entity from the Favorites Menu.

You can also manage Favorites from the User Profile page. To do this, click the Menu icon on the Taskbar and select your user. On the Profile page, you will see the Favorites button, which will open a menu for configuring Favorite Entities.
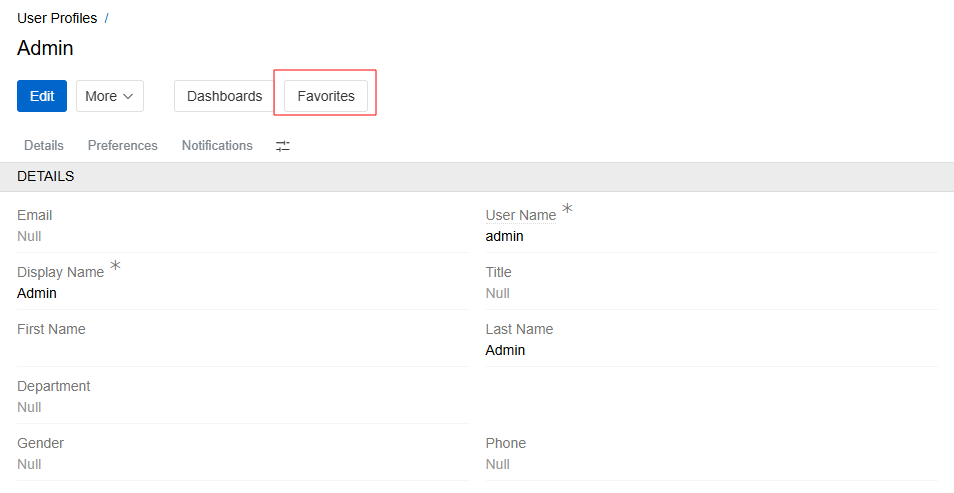
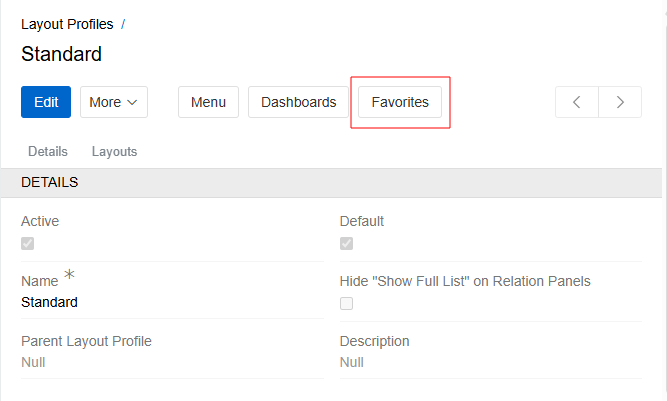
The configuration of Favorites can also be set in the Layout Profile settings. If the user has not configured the custom Favorites Menu in his Profile, it is inherited from the Layout Profile.
To configure the Favorites for a Layout Profile, go to Administration / Layout Profiles and open the Detail page of the required Profile. Click the Favorites button in the button menu.
Notifications
AtroCore provides desktop notifications that appear as bubbles in the upper right corner of the Notifications panel. You can receive notifications for various events like being mentioned in a stream, changes to records you follow, or when records are addressed to you. Click View List in the Notifications panel to see all your notifications.

For detailed information about configuring and managing notifications, please refer to the Notifications article.
Job Manager
Job Manager is opened in the pop-up window for each operation executed displaying its status and a progress circle for the currently run operation:

In the Queue Manager pop-up, all operations (import and export jobs, completeness calculation, mass update or mass delete large amount of records, etc.), which are executing in the background mode, are displayed.
You can cancel the operation directly from the Job Manager by clicking the Cancel button.
You can also pause the Job Manager. In this case, the jobs in the Pending status will not start executing until you start it again. Jobs in the Running status will continue to run.
To view the details of the performed operations, click View List in the upper right corner of the Job Manager. All the system's jobs will be displayed here, regardless of their status.
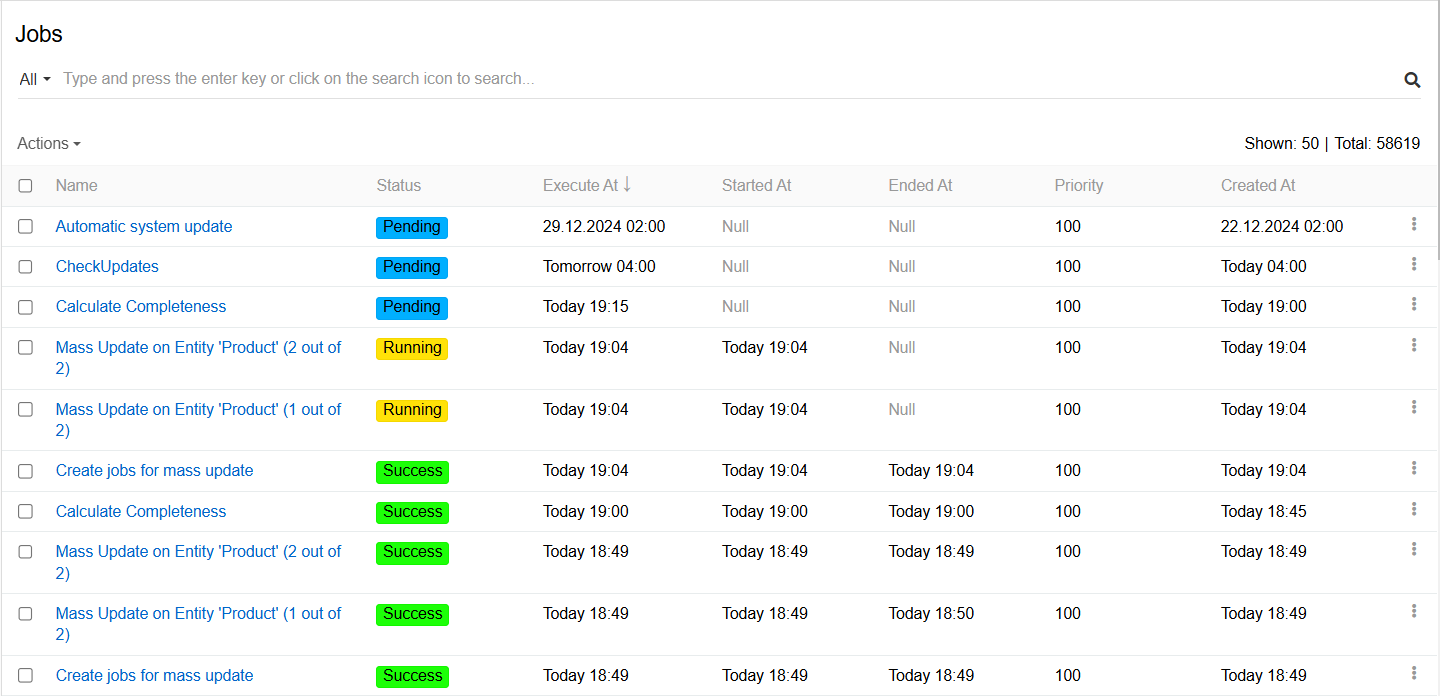
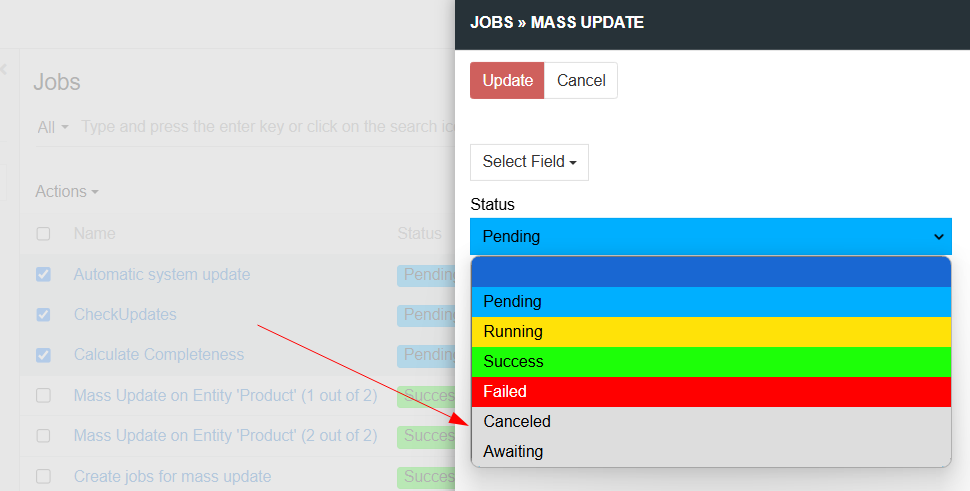
Here you can also perform a mass cancel of many jobs at once. To do this, select all the jobs you want to cancel, select Mass Update in the action menu, and change the status to Canceled.
Quick Create
To create new records from anywhere, click the quick create button located in the upper right corner of the taskbar on any AtroCore page and choose the entity for the record to be created:
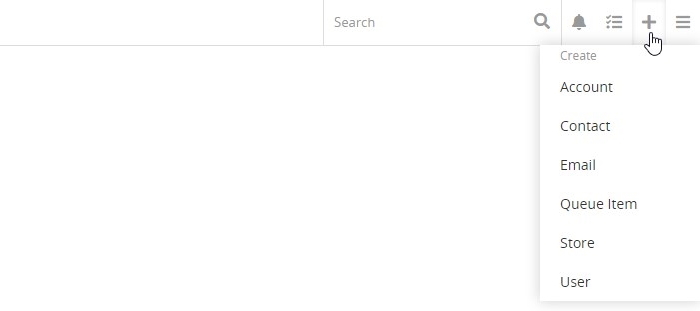
The quick create view page will be opened.
If there is no quick create button on your taskbar, please, contact your administrator.
User Menu
Click the hamburger icon in the upper right corner of the user interface to open the user menu:
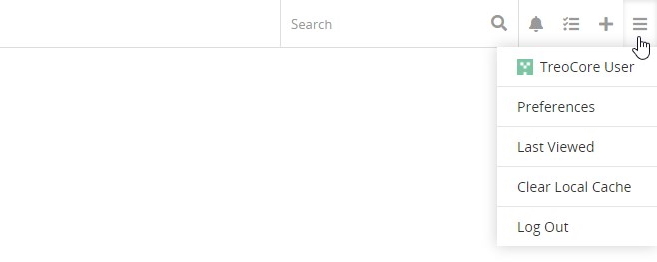
User Account
There are many configuration options available to users once logged into the system. They can be viewed and managed on the user profile and preferences pages.
User Profile
Click your username to open your user user profile page:
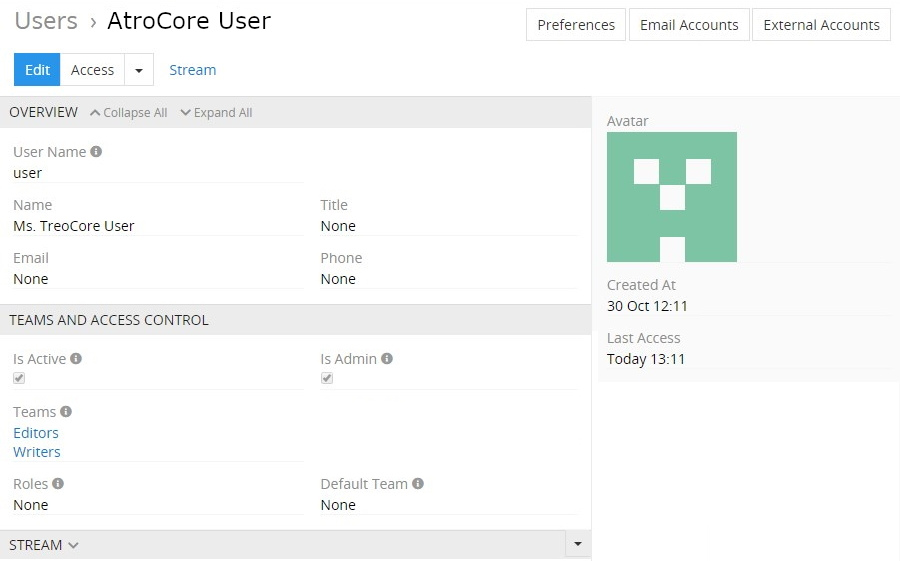
The current user personal data is given on the OVERVIEW panel, while teams and roles details are displayed on the TEAMS AND ACCESS CONTROL panel.
Click the Edit button to make changes on these two panels in the editing page that opens:
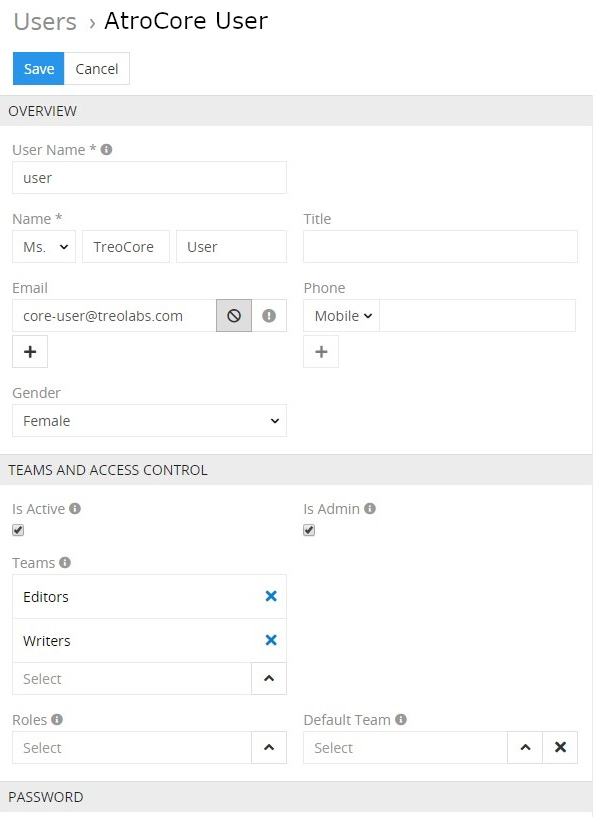
Click the Save button to apply the changes or Cancel to abort them.
If there is no
Editbutton on your user profile page, please, contact the administrator.
On the user profile page, click the Access button to view your current permissions within the AtroCore system on the scope and field levels in the pop-up window that appears:
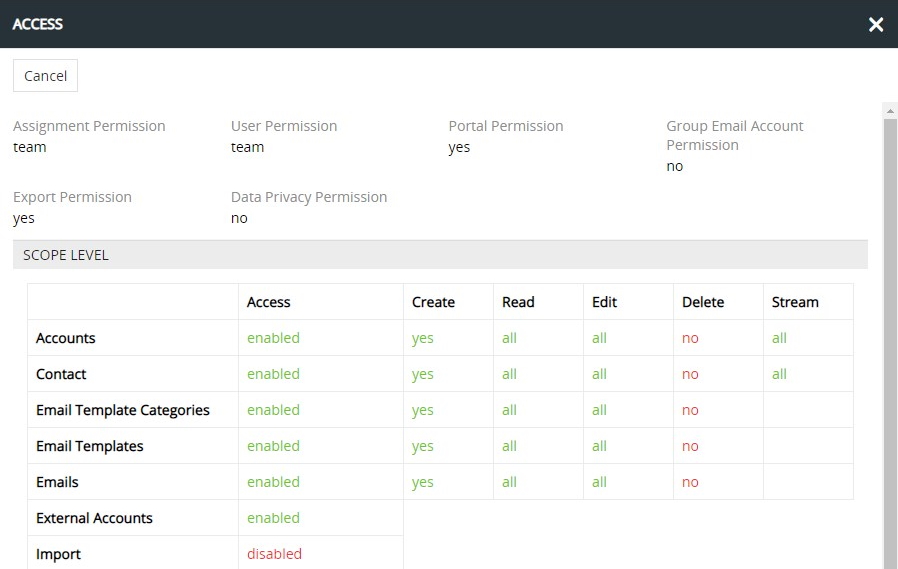
Access rights are modified by the administrator only.
Click the actions button to see the list of actions available for the currently open entity:
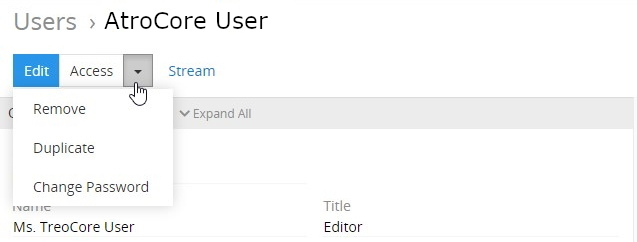
If there are less options in your actions menu, please, contact the administrator.
To remove the current user, click the Remove option and confirm your decision in the pop-up that appears. Use the Duplicate option from the same menu to go to the user creation page and get all the values of your current user record copied in the empty fields of the new user record to be created.
You can also manage your team and access control, if you have the corresponding permissions.
At the bottom of the screen you will see your personal activity stream:
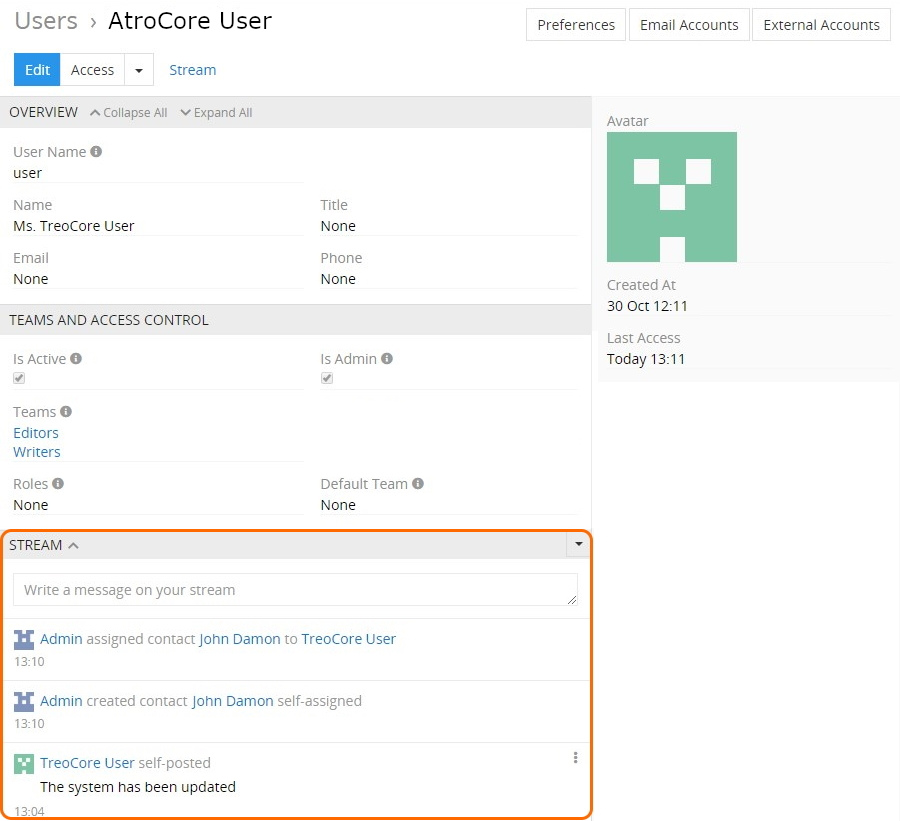
You can manage the types of activity to be displayed here in the corresponding actions menu:

Recent updates and comments about certain entity records are displayed on the activity stream panel, making it an excellent way to keep track of the changes in AtroCore.
You can also create a post in the corresponding message box right on the STREAM panel:

Self-posted messages can be edited and removed via the corresponding options of the common single-record actions menu:
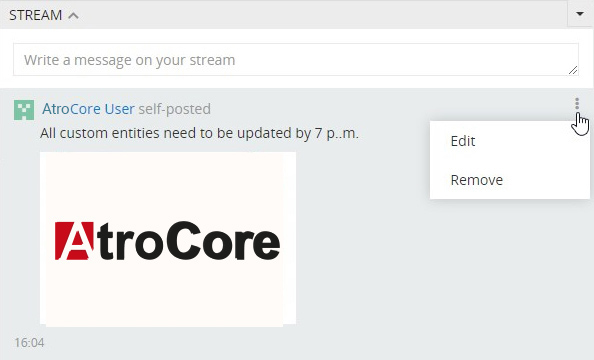
To learn more about the stream and its features, please, refer to the corresponding article within this user guide.
Managing user password
There are two options available for a user without administrator rights in the PIM:
- Change password - change the password with entering the current password
- Reset password - receive a link to reset your password by email. The option is available if the SMTP server is configured in the system.
Please note that after using the Reset Password option, you will be automatically logged out of your account and your old password will no longer be valid.
When using the "Reset password" option or changing the password (only if your environment has enabled additional validation, which involves changing the password by confirming the email - you can enable this option in the config file), the user receives an email with the corresponding link. The template for this email is stored in the Email Templates entity and can be edited by the user.
If you want to change the template for password reset, click Administration/Email Templates and select template "Password Reset".
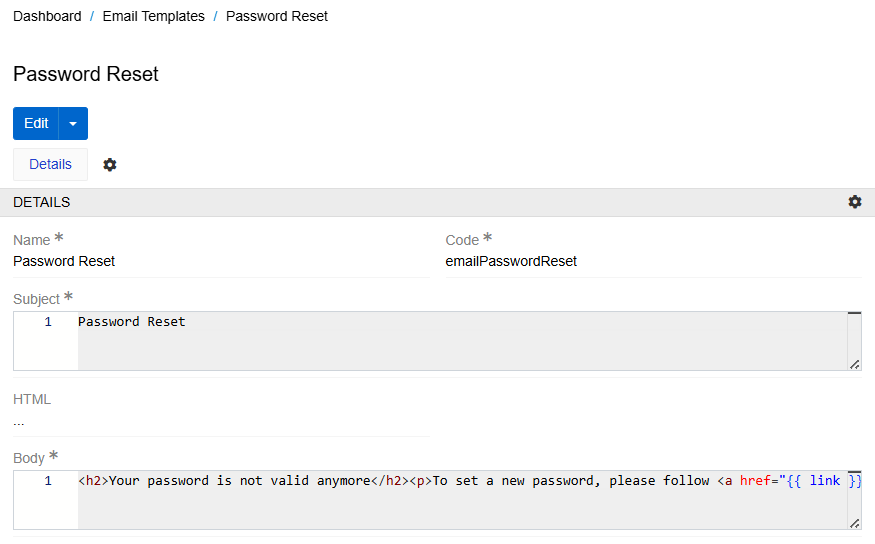
On the page that opens, you can change the subject and body of the email. Click Save button for the changes to be applied. In the same way, you can make changes to the password change template.
To change your user password, select the corresponding option in the actions drop-down menu and complete the operation on the "Change Password" page:
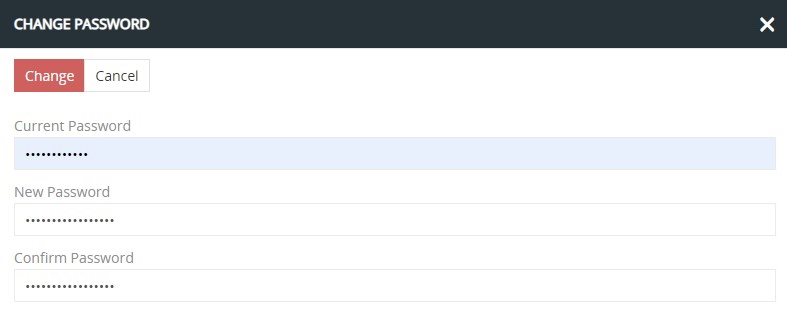
A user with admin rights can also change or reset passwords of other users.
If you forget your password, it can be recovered using the Forgot Password? link on the AtroCore login page.
If necessary, you can set the required password complexity in the instance settings (minimum number of characters, required characters, etc.). To do this, go to Administration / Settings and set the required value in field Password Regex Pattern in Security panel.

In the template example above, the password must be at least 8 characters long, contain capital letters and special characters.
In field Password expiration period (in days), you can set the password validity period. When the period expires, users will be automatically logged out of their accounts and will receive an email notification with a link to the password change.
Locales
Locale is used to set user interface parameters: language, time zone, date format, separators, etc. By default, one main Locale is created when installing PIM. You can edit it and create new Locales if necessary.
To create new Locate go to Administrations > Locales and click the Create Locale button.
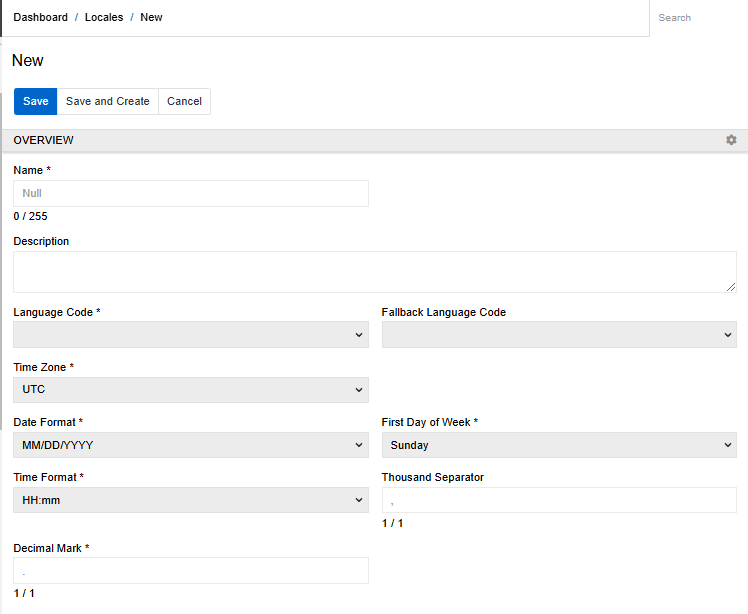
Language code - code for the main language from the list.
Fallback Language code - code for the additional language. This language will be used if there is no translation in the main language.
The user can select the Locale in the Preferences.
User Preferences
If you want to edit your user preferences, select the Preferences option from the user drop-down menu or use the Preferences button on the user profile page and make the desired changes on the "General" or "User interface" panels of the current user page.
To reset preferences to default, please click the Reset to default button.
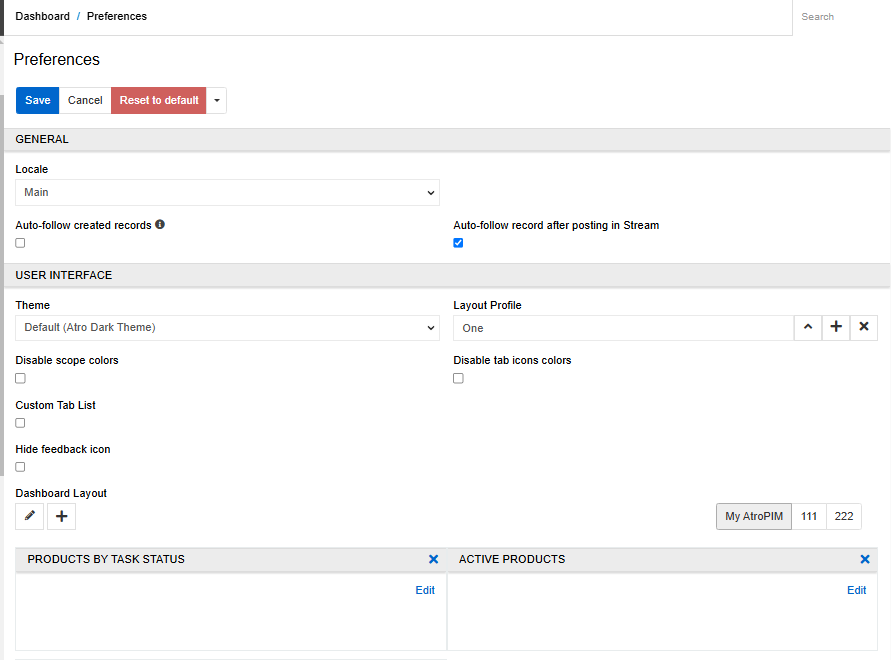
User Interface Settings
Select the Custom Tab List checkbox to enable a custom navigation menu. Using the Add button select the entities to be linked to your custom navigation menu.
Dashboard layout and dashlet settings are also available for editing on the USER INTERFACE panel:
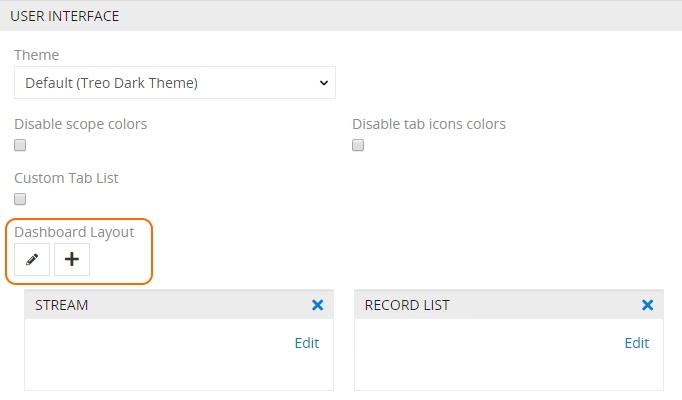
The same options are available on the AtroCore starting page:

Click the editing button and enter a name for your dashboard in the corresponding field of the "Edit dashboard" pop-up and hit Enter:
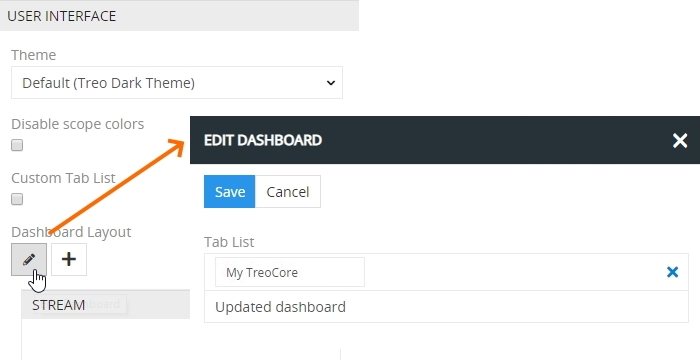
Click the Save button to finish creating the new dashboard. Use the same pencil button if you wish to rename or remove the existing dashboards.
Using the + button add as many dashlets as you need. The added dashlets can be resized using the double-headed arrow in the bottom right corner of each dashlet. Click Edit to modify the added dashlets, if needed.
To rearrange your dashboard view, drag-and-drop the dashlets right on the USER INTERFACE panel:
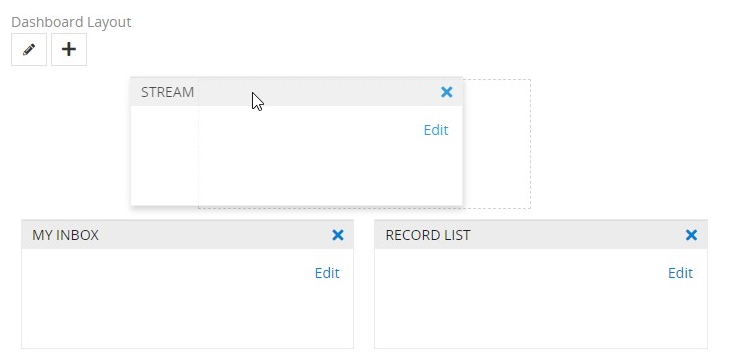
Alternatively, you can customize your dashboard view in the same way on the AtroCore starting page.
Email Accounts
AtroCore works with IMAP mail accounts, with or without SSL protection. AtroCore is able to send emails via SMTP Server, also with or without SSL protection, which can be enabled or not.
To open your personal email accounts, click the Email Accounts button on the user profile page; the list of the existing accounts, if any, will be displayed on the "Personal Email Accounts" page:

Each user can have one or more private email accounts that can be viewed, edited or removed right from the "Personal Email Accounts" list view page:

Creating
Click the Create Email Account button; the following creation page will open:
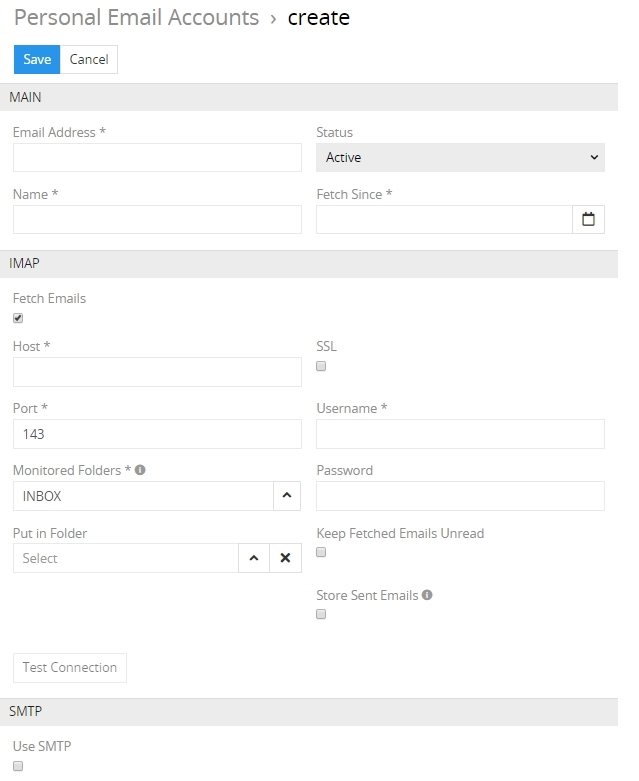
Here and fill in the required fields (marked with an asterisk) and configure the IMAP, SMTP options available in accordance with your email account server.
Last Viewed
Select the Last Viewed option from the user drop-down menu to see the history of your visited pages within the AtroCore system:

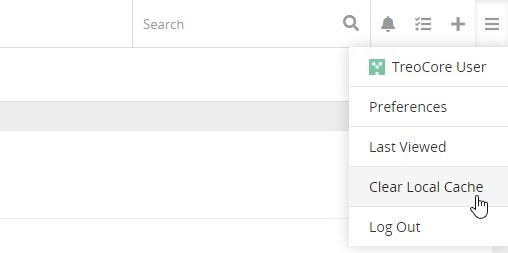
Clear Local Cache
AtroCore is a single page application (SPA). To improve the page loading time, it actively uses cache for content as well as for the user interface.
If you want to be sure in getting the latest information and application functions, please use the Clear Local Cache option from the user drop-down menu:
Breadcrumb Navigation
AtroCore comes with breadcrumb navigation on each page in the system. Breadcrumb navigation is a form of a path-style clickable navigation, which links the user back to the prior website page in the overall online route. It reveals the path the user took to arrive to the given page. The > symbol separates out the hierarchical search order from beginning to end and may look something like:
Home Page > Section Page > Subsection Page.